Welcome to the Stand Mixer Pro family! If you’re like me, you view your stand mixer as the undisputed heavyweight champion of your kitchen countertop. It whips, it kneads, it mixes… but did you know it has a secret talent? Today, we’re diving into one of my all-time favorite kitchen hacks: learning how to shred chicken with a stand mixer. Forget the tedious, hand-cramping process of pulling apart chicken with two forks. We’re about to turn a 15-minute chore into a 30-second victory lap. Ready to change your meal prep game forever? Let’s get started.
Why Use a Stand Mixer to Shred Chicken?
The answer is simple: it’s a massive time and effort saver. This method leverages the power and efficiency of your mixer’s motor and its brilliant planetary mixing action—where the beater spins on its axis while also orbiting the bowl. This ensures every piece of chicken is perfectly and uniformly shredded.
- Speed: Shred pounds of chicken in under a minute. Seriously. It’s that fast.
- Consistency: Get perfectly uniform shreds every single time, which is great for tacos, salads, and casseroles.
- Ease: It’s a hands-free operation. Just drop the chicken in, turn the mixer on, and watch the magic happen. No more sore wrists or greasy fingers.
As renowned food blogger and kitchen efficiency expert Amelia Greene often says, “Your stand mixer is the most underutilized tool for savory cooking. Shredding chicken with it isn’t just a trick; it’s a fundamental shift in how you approach meal prep.”
Getting Started: What You’ll Need
Before we unleash the power of your kitchen appliance, let’s gather our simple tools and ingredients. The beauty of this technique is its simplicity.
Ingredients
- Cooked, boneless, skinless chicken: Chicken breasts or thighs work equally well. The key is that it must be cooked through and still warm.
Equipment
- A Stand Mixer: Any model from trusted brands like KitchenAid, Cuisinart, or Kenwood will do the job.
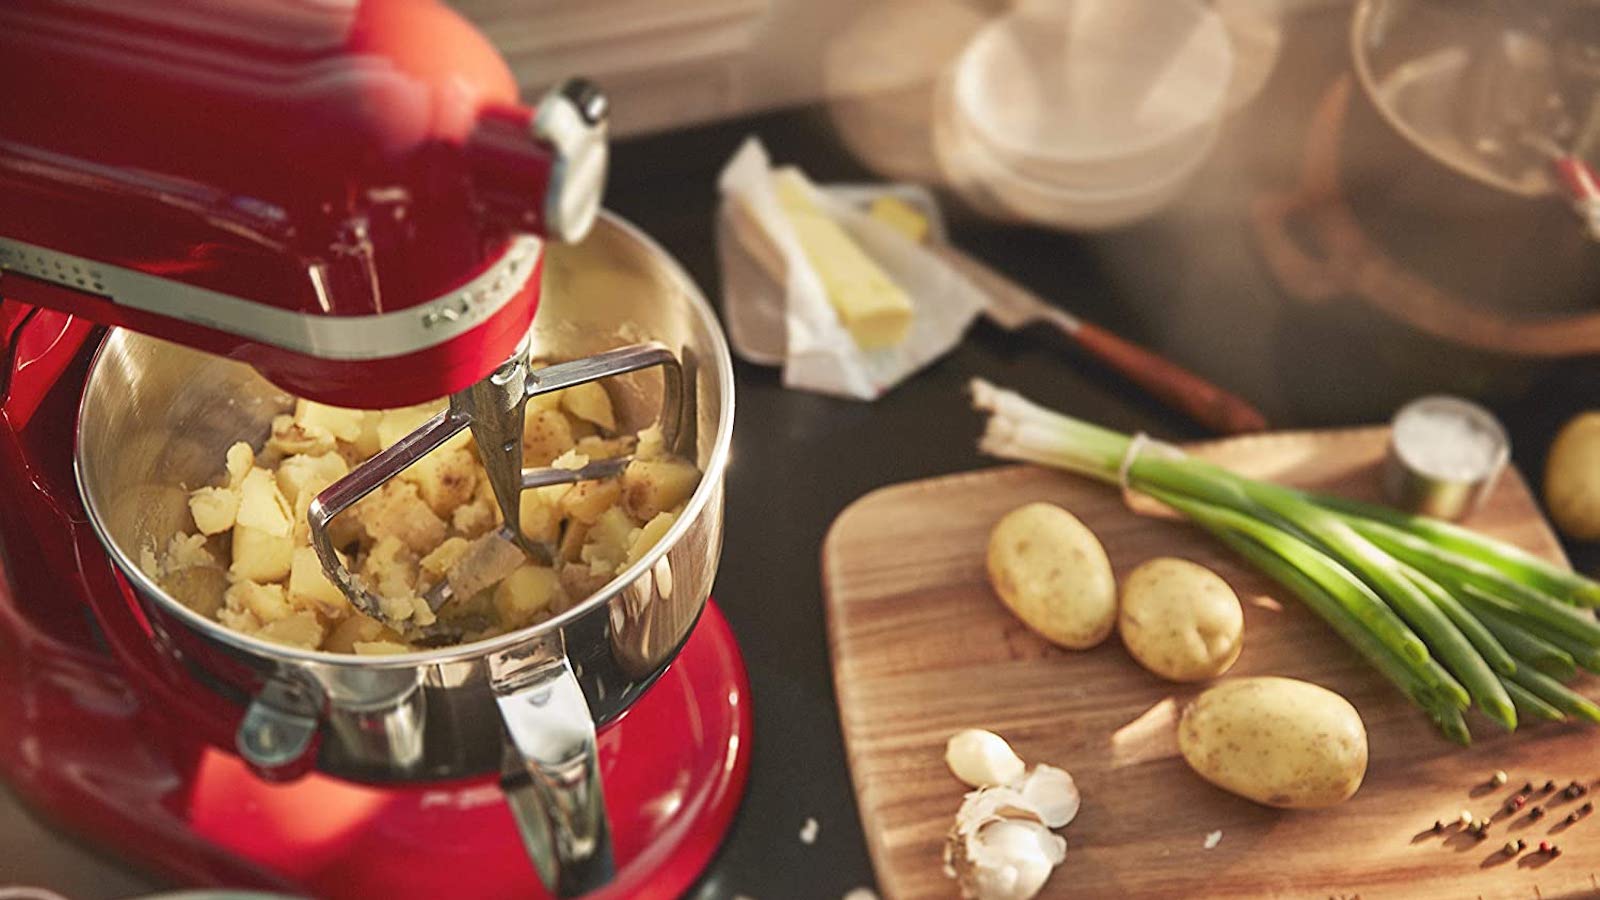
- The Flat Beater (Paddle Attachment): This is the non-negotiable star of the show. Do not use the whisk or the dough hook.
- The Stand Mixer Bowl: The one that came with your machine is perfect.
A Step-by-Step Guide on How to Shred Chicken with a Stand Mixer
Alright, it’s go-time. I remember the first time I tried this; I was skeptical, but the result was so perfect I actually laughed out loud. Follow these steps, and you will too.
- Cook Your Chicken: First things first, you need cooked chicken. You can boil, poach, bake, or even use a pressure cooker. The goal is to have tender, fully cooked chicken. My personal favorite is poaching, as it keeps the chicken incredibly moist. Make sure it’s boneless and skinless for the best results.
- Let It Cool… But Not Too Much: This is the most critical step for texture. You want the chicken to be warm, not piping hot and not cold. Hot chicken can turn mushy, and cold chicken is too firm to shred easily. Let it rest for about 5-10 minutes after cooking. It should be cool enough to handle but still steaming slightly.
- Place Chicken in the Bowl: Cut your chicken breasts or thighs into a few large chunks (2-3 pieces per breast is fine) and place them directly into the bowl of your stand mixer. Don’t overcrowd the bowl! If you’re making a large batch, it’s better to do it in two rounds. A 5-quart bowl can comfortably handle about 2-3 pounds of chicken at a time.
- Attach the Flat Beater: Secure the flat beater, or paddle attachment, onto your mixer. This is the ideal tool because its wide, flat surfaces are perfect for pulling and separating the meat fibers without turning them into paste. A whisk attachment would be a disaster, and a dough hook wouldn’t be effective.
- Lock and Load (on Low Speed!): Lock the mixer head into the down position. Now, turn the mixer on to its lowest speed setting. Speed “1” or “2” on most mixers is perfect.
- Watch the Magic: Let the mixer run for about 15-30 seconds. You’ll see the paddle attachment start to break up the chicken chunks and pull the fibers apart. It happens incredibly fast! Keep a close eye on it to avoid over-shredding, which can make the texture a bit too fine for some recipes.
- Enjoy Your Perfectly Shredded Chicken: Turn off the mixer, unlock the head, and admire your work. You now have a bowl full of beautifully shredded chicken, ready for tacos, BBQ sandwiches, buffalo chicken dip, or week-long meal prep.
Pro Tips for Shredding Perfection
After using this method countless times, I’ve picked up a few tricks that guarantee flawless results.
- Don’t Overcrowd the Bowl: Giving the chicken room to move allows the paddle to work more effectively. If you pack the bowl too tightly, you’ll end up with some large chunks and some over-processed bits.
- Pulse If You Prefer: If you’re nervous about over-shredding, instead of leaving the mixer on, you can pulse it by quickly turning it on and off a few times. This gives you more control over the final texture.
- Drain Excess Liquid: If your chicken is very moist from poaching, pat it lightly with a paper towel before putting it in the bowl. Too much liquid can make the final product a little watery.
- Works for Other Meats Too: This technique isn’t just for chicken! It works wonderfully for shredding cooked pork shoulder (for pulled pork) or beef roasts.
Common Problems and How to Fix Them
What happens if things don’t go according to plan? Don’t worry, it’s usually an easy fix.
Help! My Chicken Turned to Mush!
This almost always happens for one of two reasons: the chicken was too hot when you put it in the mixer, or you mixed it for too long or on too high a speed.
- The Fix: Next time, let the chicken cool for a few more minutes. And remember, start on the lowest speed and stop as soon as it reaches your desired consistency. It only takes seconds.
My Chicken Isn’t Shredding, It’s Just Bouncing Around.
This typically means your chicken is too cold or you’re using large, uncut pieces. The meat fibers are too firm for the paddle to grab onto.
- The Fix: Make sure the chicken is still warm. If it’s already cooled down, you can pop it in the microwave for 30 seconds to warm it up slightly. Also, ensure you’ve cut large breasts into a few smaller chunks.
Frequently Asked Questions (FAQ)
Q1: What is the best stand mixer attachment for shredding chicken?
The best and only attachment you should use is the flat beater, also known as the paddle attachment. Its design is perfect for separating the meat fibers cleanly and efficiently without pulverizing the chicken.
Q2: Can I shred chicken from frozen?
No, absolutely not. The chicken must be fully cooked, thawed, and warm before you attempt to shred it in a stand mixer. Trying to shred frozen or partially cooked chicken will be ineffective and could damage your mixer.
Q3: What speed should I use to shred chicken in my KitchenAid mixer?
You should always use the lowest speed setting, which is typically “Stir” or “Speed 2” on most KitchenAid models. High speeds will quickly turn your chicken into a paste-like mush. The goal is to gently pull the meat apart, not obliterate it.
Q4: How much chicken can I shred at one time?
This depends on the size of your mixer’s bowl. A standard 4.5 or 5-quart bowl can handle about 2 to 3 pounds of cooked chicken. For larger quantities, it’s best to work in batches to ensure even shredding and avoid overloading the motor.
Q5: Does this method work for pork or beef?
Yes! This is one of the best ways to make pulled pork. Use a slow-cooked, tender pork shoulder (Boston butt) while it’s still warm. It also works for tender beef roasts like chuck roast. The principle is the same: warm, tender meat and the paddle attachment.
Q6: Can I use a hand mixer to shred chicken?
You can, but it’s a bit messier and less efficient. Use the standard beaters and a deep, sturdy bowl to prevent chicken from flying everywhere. A Stand Mixer Provides more power, stability, and control for a much better result.
A True Kitchen Game-Changer
There you have it—a simple, brilliant technique that transforms a kitchen chore into a moment of pure satisfaction. Learning how to shred chicken with a stand mixer is more than just a cool party trick; it’s a testament to the versatility and power packed into this incredible kitchen appliance. It saves you time, gives you a better result, and empowers you to be more efficient in your cooking. This is the kind of discovery that makes you fall in love with your stand mixer all over again.
So go ahead, give it a try. We’d love to hear about your experience! What will you make with all your perfectly shredded chicken? Share your thoughts and culinary creations in the comments below.