Welcome to the heart of every great loaf and perfect pastry: proper dough kneading. As a seasoned technician with over a decade immersed in the world of stand mixers, from vintage marvels to cutting-edge models, I’ve seen firsthand how these incredible machines transform baking. While the stand mixer makes the process significantly easier than hand kneading, achieving that ideal, elastic dough still requires a touch of understanding and a few expert tricks. This guide will walk you through everything you need to know to harness your stand mixer’s power, ensuring perfectly kneaded dough every single time, ready for your next culinary masterpiece.
The Art and Science of Dough Kneading in a Stand Mixer
Kneading is more than just mixing ingredients; it’s a vital process that develops gluten, the protein network responsible for the structure, texture, and rise of your baked goods. When you knead, you stretch and fold the dough, aligning these gluten strands to create elasticity and strength. This allows your dough to trap the gases produced by yeast, giving bread its characteristic airy crumb and chewy texture.
Using a stand mixer for kneading offers immense benefits. It saves your arms from a strenuous workout, ensures consistent and thorough kneading, and frees up your hands for other kitchen tasks. The stand mixer’s specialized dough hook attachment is designed to mimic the pushing, stretching, and folding motions of hand kneading, making it an indispensable tool for any serious baker.
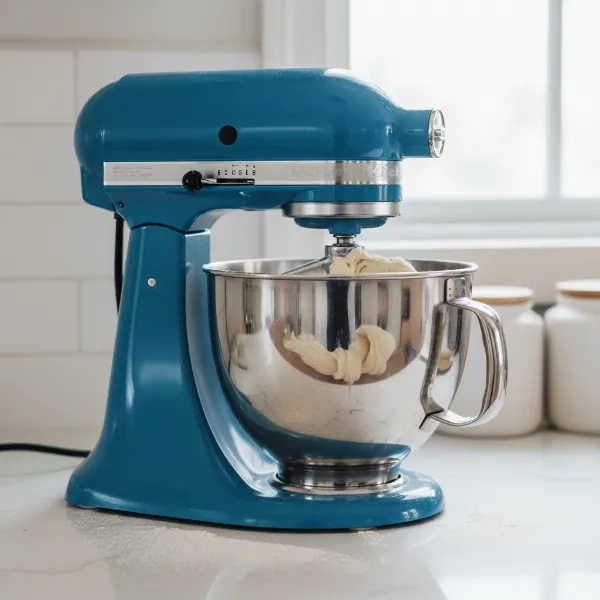 A stand mixer with a dough hook actively kneading bread dough in a stainless steel bowl.
Essential Gear: Your Stand Mixer and the Dough Hook
A stand mixer is a powerful kitchen appliance with a motor that drives various attachments. For kneading, the star of the show is undeniably the dough hook. This curved, hook-shaped attachment is specifically engineered to gently pull, stretch, and fold dough within the mixer bowl, effectively developing the gluten without overworking it.
Ensuring your dough hook is properly installed is the first crucial step. Most stand mixers feature an attachment hub where you slide the hook onto a pin, push it up to compress a spring, twist to lock it in place, then release the spring to secure it. Always double-check that the attachment is firmly seated before starting your mixer to prevent any issues during operation.
Step-by-Step Guide to Perfect Stand Mixer Kneading
Achieving beautifully kneaded dough in your stand mixer is a methodical process that, once mastered, becomes second nature.
Preparation is Key
|
Our Picks for the Best Stand mixer in 2026
As an Amazon Associate I earn from qualifying purchases.
|
||
| Num | Product | Action |
|---|---|---|
| 1 | Cuisinart SMD-50GPH Precision Pro 5.5-Quart Digital Stand Mixer with 12-Speeds, 3 Preprogrammed Food Prep Settings, Mixing Bowl, Whisk, Flat Mixing Paddle, Dough Hook, and Splash Guard, Graphite |

|
| 2 | 3-IN-1 Electric Stand Mixer, 6.5QT Bowl 660W 10-Speed Kitchen Mixer, Household Food Mixers include Dough Hook, Beater and Whisk, Bread Cake Mixer for Baking and Most Home Cooks, Red |
|
| 3 | Cuisinart Stand Mixer, 12 Speeds, 5.5-Quart Mixing Bowl, Chef's Whisk, Flat Mixing Paddle, Dough Hook, and Splash Guard with Pour Spout, Silver Lining, SM-50BC, Silver Lining |
|
| 4 | Cuisinart SMD-50BC Precision Pro 5.5-Quart Digital Stand Mixer With 12-Speeds, 3 Preprogrammed Food Prep Settings, Mixing Bowl, Whisk, Flat Mixing Paddle, Dough Hook, And Splash Guard, Silver Lining |
|
| 5 | Cuisinart SPI-50 Spiralizer, White |
|
| 6 | Kitchen in the box Stand Mixer,3.2Qt Small Electric Food Mixer,6 Speeds Portable Lightweight Kitchen Mixer for Daily Use with Egg Whisk,Dough Hook,Flat Beater (Blue) |
|
| 7 | Kitchen in the box Stand Mixer,3.2Qt Small Electric Food Mixer,6 Speeds Portable Lightweight Kitchen Mixer for Daily Use with Egg Whisk,Dough Hook,Flat Beater (Black) |
|
| 8 | Kitchen in the box Stand Mixer,3.2Qt Mini Electric Food Mixer,6 Speeds Portable Lightweight Kitchen Mixer for Daily Use with Egg Whisk,Dough Hook,Flat Beater (Green) |
|
| 9 | Cuisinart SM-50G Precision Master 5.5-Quart 12-Speed Stand Mixer with Mixing Bowl, Chef's Whisk, Flat Mixing Paddle, Dough Hook, and Splash Guard with Pour Spout, Agave Green, Manual |
|
| 10 | Cuisinart SMD-50CRM Precision Pro 5.5-Quart Digital Stand Mixer with 12-Speeds, 3 Preprogrammed Food Prep Settings, Mixing Bowl, Chef's Whisk, Flat Mixing Paddle, Dough Hook, and Splash Guard, Cream |
|
Before you even turn on your mixer, a little preparation goes a long way. First, gather all your ingredients and measure them accurately. Baking is a science, and precise measurements are paramount for proper dough consistency. Next, ensure your stand mixer is on a stable, flat surface. Attach the dough hook securely to your mixer. Finally, add your ingredients into the mixer bowl according to your recipe. Often, dry ingredients are added first, followed by wet ingredients, but always defer to your specific recipe’s instructions.
The Kneading Process: Speeds and Times
Once your ingredients are in the bowl, it’s time to begin. Start your mixer on Speed 1 (the lowest setting) for an initial mix. This gentle speed allows the ingredients to come together into a shaggy, cohesive mass without sending flour flying out of the bowl. Mix just until no dry pockets of flour remain, typically for about 1-2 minutes.
After the initial combining, increase your mixer speed to Speed 2 for kneading. Most stand mixer manufacturers, especially for popular brands like KitchenAid, strongly recommend using Speed 2 for kneading yeast doughs. Higher speeds can put undue strain on your mixer’s motor and gears, potentially leading to damage. The planetary action of the stand mixer, combined with the dough hook at Speed 2, is highly efficient and performs the kneading action effectively.
Regarding kneading duration, this is where many home bakers seek guidance, and it can vary. While some stand mixer instructions suggest a relatively short kneading time, often 2-4 minutes after initial mixing, practical experience and varying dough types often call for a longer duration. For many standard bread doughs, you might find yourself kneading for 6-8 minutes, or even up to 10-15 minutes for denser or higher-hydration doughs. The key is to prioritize the texture and feel of the dough over strict adherence to a timer.
“Understanding your dough’s transformation is more important than watching the clock. The dough will tell you when it’s ready.” – Admin, Standmixerpro.com
Recognizing Perfectly Kneaded Dough
Knowing when your dough is perfectly kneaded is crucial for optimal results. Look for these visual and tactile cues:
- Visual Cues: The dough should appear smooth and elastic, losing its shaggy, lumpy appearance. It should also begin to clean the sides of the bowl, gathering around the dough hook and pulling away cleanly from the bowl’s interior.
- Tactile Cues: When touched, properly kneaded dough should feel smooth and slightly tacky, but not excessively sticky. If you press it lightly with your finger, it should slowly spring back into place.
- The Windowpane Test: This is the ultimate test for gluten development. Tear off a small piece of dough (about a golf ball size) and gently stretch it between your fingers. If you can stretch it thin enough to see light pass through it without it tearing, creating a translucent “windowpane,” your dough has developed sufficient gluten and is perfectly kneaded.
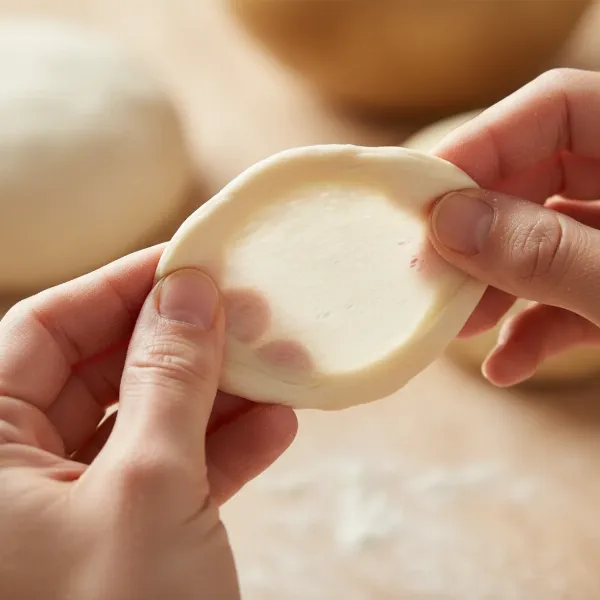 Hands gently stretching a small piece of bread dough to perform the windowpane test.
Common Dough Kneading Challenges and Solutions
Even with the best intentions, you might encounter a few hurdles during the kneading process. Knowing how to address them will save your dough and your sanity.
The Dough is Climbing the Hook
This is a common occurrence, especially with stickier doughs or when the dough starts to become over-kneaded. If your dough begins to climb up the dough hook towards the mixer head, simply stop the mixer, push the dough back down into the bowl with a spatula or your hands, and resume kneading. If it continues to climb persistently, it might indicate that the dough is either too sticky and needs a tiny bit more flour (added a tablespoon at a time) or is nearing its fully kneaded state.
Sticky Dough Syndrome
Some doughs, particularly those with higher hydration levels (more water relative to flour), are naturally sticky, and this is perfectly fine. However, if your dough is excessively sticky and refusing to come together or clean the sides of the bowl even after several minutes of kneading, you might need to adjust. Add flour one tablespoon at a time, allowing it to fully incorporate after each addition, until the dough reaches a manageable, slightly tacky consistency that pulls away from the bowl. Avoid adding too much flour, as this can result in a dry, dense final product.
Over-Kneading vs. Under-Kneading
Both over-kneading and under-kneading can negatively impact your baked goods.
- Under-kneading: If your dough isn’t kneaded enough, the gluten network won’t be fully developed. This results in a weak, loose dough that won’t hold its shape, won’t rise properly, and will yield a dense, crumbly product.
- Over-kneading: While harder to achieve in a stand mixer than by hand, over-kneading can occur. If the dough is kneaded for too long, the gluten strands can become damaged, leading to a dough that is tight, tough, and difficult to work with. The resulting baked good may be rubbery or hard. Your mixer’s motor may also start to feel warm if it’s working too hard for too long; if this happens, give your mixer a short rest before continuing.
Advanced Tips for Stand Mixer Dough Kneading
Taking your kneading skills to the next level involves understanding how different dough types behave and utilizing specific techniques.
- Hydration Levels and Their Impact: High-hydration doughs, often used for artisan breads, can be stickier and seem more challenging to knead. They might take longer to develop the necessary gluten structure. Don’t be tempted to add too much flour; instead, allow the mixer more time at Speed 2, or consider incorporating a series of stretch-and-folds during the first rise.
- Enriched Doughs vs. Lean Doughs: Doughs enriched with butter, eggs, or sugar (like brioche or challah) tend to inhibit gluten formation because these ingredients interfere with the flour’s ability to absorb water. As a result, enriched doughs often require longer kneading times to achieve proper gluten development. Lean doughs, made primarily with flour, water, yeast, and salt, develop gluten more quickly.
- The Autolyse Technique: This simple technique involves mixing just the flour and water together and letting them rest for 20-30 minutes before adding the salt and yeast (and other ingredients). This allows the flour to fully hydrate and enzyme activity to begin breaking down proteins, which jumpstarts gluten development, making subsequent kneading easier and potentially shorter.
- Resting the Mixer: For very large batches or particularly dense doughs, your stand mixer’s motor can heat up. If you notice your mixer getting warm or struggling, it’s wise to stop it for 5-10 minutes to allow the motor to cool down. This simple practice prolongs the life of your appliance.
Buying Guide: Choosing the Right Stand Mixer for Your Kneading Needs
As the Admin of Standmixerpro.com, I can tell you that selecting the right stand mixer is paramount for those who frequently knead dough. Look for a mixer with a robust motor, often measured in watts or horsepower, as denser doughs require more power. Bowl capacity is another crucial factor; larger batches of dough necessitate a larger bowl. Finally, consider the durability and brand reputation. Brands like KitchenAid have a long-standing reputation for reliable stand mixers that can handle the rigors of dough kneading, and their clear guidelines for speed and usage are designed to protect your investment. Investing in a quality stand mixer means years of effortless kneading and delicious results.
Conclusion
Mastering dough kneading with your stand mixer is a journey that transforms your baking experience. By understanding the role of the dough hook, adhering to recommended speeds, interpreting the visual and tactile cues of properly kneaded dough, and troubleshooting common issues, you unlock the full potential of your appliance. Remember, patience and observation are your best allies in the kitchen. So go ahead, confidently attach that dough hook, turn on your mixer, and embrace the satisfaction of creating perfect dough for your next batch of homemade bread, pizza, or pastries. What delicious creation will you bake first with your expertly kneaded dough?
Frequently Asked Questions
What is the best speed for kneading dough in a stand mixer?
For most stand mixers, especially KitchenAid models, Speed 2 is the recommended setting for kneading yeast dough. This speed effectively develops gluten without overstraining the motor, ensuring efficient and safe operation.
How long should I knead dough in a stand mixer?
While recipes vary, a general guideline is to mix ingredients on Speed 1 for 1-2 minutes, then knead on Speed 2 for an additional 6-10 minutes. Always prioritize the dough’s texture and feel over a strict timer; aim for smooth, elastic dough that passes the windowpane test.
How do I know if my dough is kneaded enough?
Properly kneaded dough will be smooth and elastic, pull away cleanly from the sides of the mixing bowl, feel slightly tacky (but not sticky), and spring back when gently poked. The definitive test is the “windowpane test,” where a small piece can be stretched thin enough to be translucent without tearing.
Can you over-knead dough in a stand mixer?
While less common than with hand kneading, it is possible to over-knead dough in a stand mixer, especially with very dense doughs or prolonged high speeds. Over-kneaded dough becomes tight, tough, and difficult to work with, resulting in a dense, rubbery final product. Always monitor your dough’s texture.
What should I do if my dough is climbing the dough hook?
If your dough is climbing the hook, stop the mixer and push the dough back down into the bowl. This often happens with stickier doughs or as the dough becomes fully kneaded. You might also add a tiny bit more flour (a tablespoon at a time) if the dough is excessively sticky.