Dreaming of fresh, flavorful sausages made right in your own kitchen? As an admin for Standmixerpro.com with over a decade of hands-on experience in the world of stand mixers, I can tell you that making your own sausages is not only achievable but also incredibly rewarding. Your trusty stand mixer, paired with a grinder attachment, transforms fresh cuts of meat into delicious, customized links. This guide will walk you through every step, ensuring your homemade sausages are a resounding success.
Stand Mixer Grinder Attachments: Your Gateway to Homemade Sausage
A stand mixer is a versatile kitchen powerhouse, and with the right attachments, its capabilities extend far beyond baking. The meat grinder attachment, often accompanied by various grinding plates and sausage stuffing tubes, is essential for home sausage making. It allows you to control the quality of ingredients, the texture of the grind, and the flavor profile, offering a truly bespoke culinary experience.
Historically, meat grinding was a laborious manual task. Early machines were hand-cranked, requiring significant effort. The advent of electric stand mixers revolutionized this process, making it accessible to home cooks. Today, modern stand mixer grinder attachments are designed for efficiency and ease of use, ensuring that even complex tasks like sausage making become enjoyable.
While various stand mixer brands offer their own attachments, the core function remains the same: to process meat and then extrude it into casings. These attachments typically come with different sized dies for fine or coarse grinding, and a range of stuffing tubes to accommodate various casing sizes.
How to Make Sausage Using a Mixer Grinder Attachment: A Step-by-Step Guide
Making sausage at home involves a few key stages: preparing your ingredients, grinding the meat, seasoning the mixture, and finally, stuffing the casings. Precision and temperature control are paramount for excellent results.
Essential Equipment You’ll Need
|
Our Picks for the Best Stand mixer in 2026
As an Amazon Associate I earn from qualifying purchases.
|
||
| Num | Product | Action |
|---|---|---|
| 1 | Kitchen in the box Stand Mixer,3.2Qt Mini Electric Food Mixer,6 Speeds Portable Lightweight Kitchen Mixer for Daily Use with Egg Whisk,Dough Hook,Flat Beater (Green) |

|
| 2 | Cuisinart SM-50G Precision Master 5.5-Quart 12-Speed Stand Mixer with Mixing Bowl, Chef's Whisk, Flat Mixing Paddle, Dough Hook, and Splash Guard with Pour Spout, Agave Green, Manual |
|
| 3 | Kitchen in the box Stand Mixer,3.2Qt Small Electric Food Mixer,6 Speeds Portable Lightweight Kitchen Mixer for Daily Use with Egg Whisk,Dough Hook,Flat Beater (Black) |
|
| 4 | Cuisinart SMD-50CRM Precision Pro 5.5-Quart Digital Stand Mixer with 12-Speeds, 3 Preprogrammed Food Prep Settings, Mixing Bowl, Chef's Whisk, Flat Mixing Paddle, Dough Hook, and Splash Guard, Cream |
|
| 5 | Kitchen in the box Stand Mixer,3.2Qt Small Electric Food Mixer,6 Speeds Portable Lightweight Kitchen Mixer for Daily Use with Egg Whisk,Dough Hook,Flat Beater (Blue) |
|
| 6 | Cuisinart Stand Mixer, 12 Speeds, 5.5-Quart Mixing Bowl, Chef's Whisk, Flat Mixing Paddle, Dough Hook, and Splash Guard with Pour Spout, Silver Lining, SM-50BC, Silver Lining |
|
| 7 | Cuisinart SMD-50GPH Precision Pro 5.5-Quart Digital Stand Mixer with 12-Speeds, 3 Preprogrammed Food Prep Settings, Mixing Bowl, Whisk, Flat Mixing Paddle, Dough Hook, and Splash Guard, Graphite |
|
| 8 | Cuisinart SMD-50BC Precision Pro 5.5-Quart Digital Stand Mixer With 12-Speeds, 3 Preprogrammed Food Prep Settings, Mixing Bowl, Whisk, Flat Mixing Paddle, Dough Hook, And Splash Guard, Silver Lining |
|
| 9 | 3-IN-1 Electric Stand Mixer, 6.5QT Bowl 660W 10-Speed Kitchen Mixer, Household Food Mixers include Dough Hook, Beater and Whisk, Bread Cake Mixer for Baking and Most Home Cooks, Red |
|
| 10 | Cuisinart SPI-50 Spiralizer, White |
|
Before you begin, gather your tools. You’ll need your stand mixer, the meat grinder attachment (including the grinding plates and stuffing tubes), a sharp knife, large mixing bowls, sausage casings (natural or collagen), and ice or ice water to keep ingredients cold. Some recipes might also call for a sausage pricker.
Step 1: Prepare the Meat and Fat
The foundation of great sausage is quality meat and proper fat content. Pork shoulder is a popular choice due to its ideal meat-to-fat ratio. You can also incorporate other meats like beef or chicken, and for richer flavor, add pork fatback.
Begin by trimming any sinew or silver skin from your meat. Then, cut the meat and fat into small, uniform cubes, roughly 1 to 2 inches in size. This ensures they feed smoothly into the grinder, preventing strain on your stand mixer’s motor.
Crucial Tip: Chill Everything! Temperature control is the single most important factor in sausage making. Place your cubed meat and fat into the freezer for 30-60 minutes, or until partially frozen (around 32°F / 0°C). Simultaneously, chill your stand mixer grinder attachment components—the grinder head, auger, blade, and plate—in the freezer. This prevents the fat from rendering prematurely, ensuring a clean, pebbly grind and a juicy final product.
Step 2: Grind the Meat
Assemble your chilled grinder attachment onto your stand mixer. Choose your desired grinding plate – a coarser plate for a rustic sausage, or a finer one for a smoother texture.
Working in small batches (3-5 pounds at a time), feed the cold meat cubes into the grinder. For most stand mixer grinder attachments, it’s recommended to grind on the highest speed setting. This helps process the meat quickly and efficiently, minimizing heat generation. Avoid smashing the meat down with the plunger; allow the auger to pull it through naturally.
For a finer texture, you can grind the meat a second time. After grinding, immediately place the ground meat back into the freezer to rechill it, as the grinding process can generate some heat.
 A stand mixer with a grinder attachment actively grinding fresh meat into a bowl.
Step 3: Season and Mix the Sausage
Once the meat is thoroughly chilled, transfer it to a large mixing bowl. Now comes the creative part: adding your seasonings! This is where you infuse your sausages with your desired flavor profile, whether it’s classic Italian herbs, spicy chorizo blends, or savory breakfast sausage spices. Don’t forget salt, pepper, garlic, and any liquid ingredients like ice-cold beer or water.
Using your hands (or your stand mixer with a paddle attachment on the lowest speed), mix the meat and seasonings thoroughly. The goal is to distribute the spices evenly and develop the meat’s proteins until the mixture becomes sticky. You’ll know it’s ready when you can grab a small handful and it adheres to your palm when you turn your hand upside down. This stickiness is vital for a good bind and a cohesive sausage texture. Again, rechill the mixed meat in the freezer until it’s very cold (around 28°F / -2°C) before stuffing.
Step 4: Prepare and Stuff the Casings
Properly rehydrating your sausage casings is essential for a tender, snappy bite. If using natural casings, rinse them thoroughly to remove any salt, then soak them in cool water with a pinch of baking soda (1 tsp per quart of water) overnight in the refrigerator. The baking soda helps lubricate the casings, reducing the risk of tearing during stuffing.
Attach the sausage stuffing tube to your stand mixer grinder attachment. Carefully slide the rehydrated casing onto the tube, gathering it gently. Leave a small overhang at the end of the tube.
With your stand mixer set to the lowest speed, feed the well-chilled sausage mixture into the grinder. As the meat extrudes into the casing, gently guide the casing off the tube. The key is to stuff it evenly without overfilling. An overstuffed casing can rupture during linking or cooking. You should be able to gently squeeze the sausage and leave a slight indentation. If it feels like it might burst, it’s too tight.
If possible, having a helper during the stuffing phase can make the process much smoother, with one person feeding meat and the other guiding the casing.
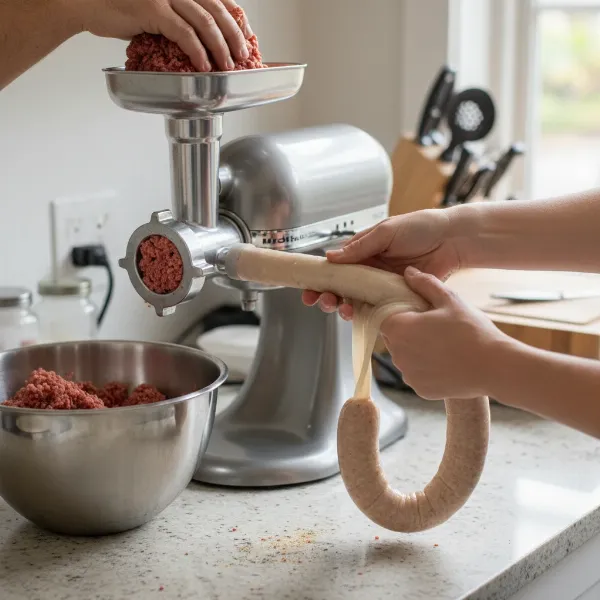 A stand mixer with a sausage stuffing attachment filling natural casings with seasoned ground meat.
Step 5: Link, Store, and Cook Your Sausages
Once the casing is filled, you can form individual links. Gently pinch and twist the sausage at your desired length (typically 6 inches), alternating the direction of the twist for each link to prevent unraveling. Tie off the ends with butcher’s twine.
Inspect your sausages for any air pockets. Use a sausage pricker or a clean needle to gently poke these pockets, allowing the air to escape. This ensures the casing adheres properly to the meat and prevents chewy spots.
For optimal flavor development and to allow the casings to dry slightly, refrigerate your fresh sausages overnight. This also helps the spices meld.
You can cook your homemade sausages by grilling, pan-frying, or boiling. If you’re not cooking them immediately, store them in the refrigerator for up to 5 days or freeze them for longer storage.
Buying Guide: Expert Tips for Choosing Your Stand Mixer Grinder Attachment
Selecting the right stand mixer grinder attachment can enhance your sausage-making journey.
“Investing in a quality metal grinder attachment is crucial. Plastic versions struggle to maintain the cold temperatures necessary for optimal fat emulsification, leading to subpar sausage texture.” – Chef Elena Rodriguez, Culinary Instructor
Consider these factors when choosing:
- Material: Metal attachments (stainless steel or aluminum) are highly recommended as they can be chilled effectively, maintaining a low temperature critical for grinding fat. Plastic attachments often don’t retain cold well.
- Grinding Plates: Look for attachments that come with various grinding plate sizes (coarse, medium, fine) to allow for versatility in texture.
- Stuffing Tubes: Ensure the attachment includes a range of stuffing tube sizes to accommodate different casing diameters for various sausage types.
- Brand Compatibility: Always check that the attachment is compatible with your specific stand mixer model.
Where to Buy Stand Mixer Grinder Attachments
You can typically find stand mixer grinder attachments at major kitchen appliance retailers, department stores, and online marketplaces. Brands like KitchenAid, Cuisinart, and Kenwood often offer attachments specifically designed for their stand mixers. When purchasing online, pay attention to reviews regarding the attachment’s durability and ease of use.
Mastering the Art of Homemade Sausage
Making sausage with your stand mixer grinder attachment is an incredibly rewarding experience that allows for endless customization. By following these steps and paying close attention to temperature, you’ll produce delicious, high-quality sausages that far surpass store-bought varieties.
What’s your favorite sausage flavor to make at home?