Few things are as disheartening to a home baker or culinary enthusiast as discovering your trusty KitchenAid stand mixer is leaking oil. That dark, greasy residue beneath your machine or dripping into your mixing bowl can be alarming. But don’t worry – this common issue is usually fixable, and often, you can tackle it yourself. This guide will walk you through why your KitchenAid mixer might be leaking, what steps you can take to address it, and how to prevent it from happening again, ensuring your beloved appliance continues to whip up culinary magic for years to come.
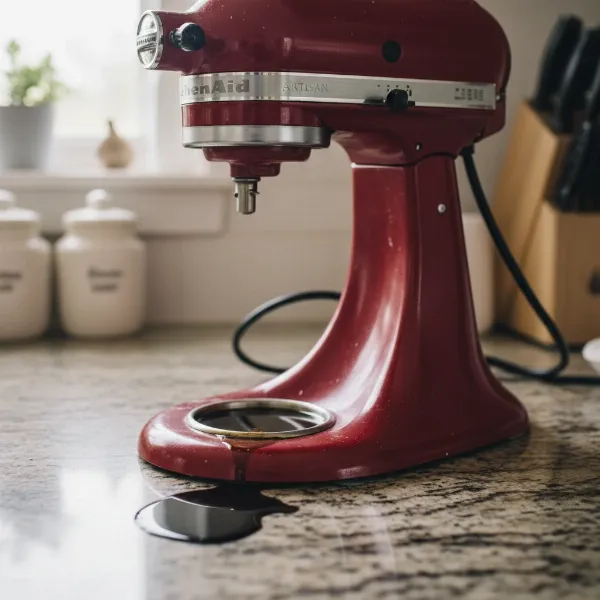 Close-up of a KitchenAid stand mixer with visible oil leak underneath, showing the common issue
Understanding Why Your KitchenAid Mixer Leaks Oil
The presence of oil around your KitchenAid mixer typically points to an internal issue with the appliance’s lubrication system. The core problem is almost always related to the specialized grease within the mixer’s gearbox.
The Root Cause: Grease Separation
|
Our Picks for the Best Stand mixer in 2026
As an Amazon Associate I earn from qualifying purchases.
|
||
| Num | Product | Action |
|---|---|---|
| 1 | Cuisinart SPI-50 Spiralizer, White |

|
| 2 | Kitchen in the box Stand Mixer,3.2Qt Small Electric Food Mixer,6 Speeds Portable Lightweight Kitchen Mixer for Daily Use with Egg Whisk,Dough Hook,Flat Beater (Blue) |
|
| 3 | Kitchen in the box Stand Mixer,3.2Qt Small Electric Food Mixer,6 Speeds Portable Lightweight Kitchen Mixer for Daily Use with Egg Whisk,Dough Hook,Flat Beater (Black) |
|
| 4 | Cuisinart Stand Mixer, 12 Speeds, 5.5-Quart Mixing Bowl, Chef's Whisk, Flat Mixing Paddle, Dough Hook, and Splash Guard with Pour Spout, Silver Lining, SM-50BC, Silver Lining |
|
| 5 | Cuisinart SMD-50CRM Precision Pro 5.5-Quart Digital Stand Mixer with 12-Speeds, 3 Preprogrammed Food Prep Settings, Mixing Bowl, Chef's Whisk, Flat Mixing Paddle, Dough Hook, and Splash Guard, Cream |
|
| 6 | Kitchen in the box Stand Mixer,3.2Qt Mini Electric Food Mixer,6 Speeds Portable Lightweight Kitchen Mixer for Daily Use with Egg Whisk,Dough Hook,Flat Beater (Green) |
|
| 7 | Cuisinart SMD-50GPH Precision Pro 5.5-Quart Digital Stand Mixer with 12-Speeds, 3 Preprogrammed Food Prep Settings, Mixing Bowl, Whisk, Flat Mixing Paddle, Dough Hook, and Splash Guard, Graphite |
|
| 8 | 3-IN-1 Electric Stand Mixer, 6.5QT Bowl 660W 10-Speed Kitchen Mixer, Household Food Mixers include Dough Hook, Beater and Whisk, Bread Cake Mixer for Baking and Most Home Cooks, Red |
|
| 9 | Cuisinart SM-50G Precision Master 5.5-Quart 12-Speed Stand Mixer with Mixing Bowl, Chef's Whisk, Flat Mixing Paddle, Dough Hook, and Splash Guard with Pour Spout, Agave Green, Manual |
|
| 10 | Cuisinart SMD-50BC Precision Pro 5.5-Quart Digital Stand Mixer With 12-Speeds, 3 Preprogrammed Food Prep Settings, Mixing Bowl, Whisk, Flat Mixing Paddle, Dough Hook, And Splash Guard, Silver Lining |
|
Inside every KitchenAid stand mixer, a hefty amount of food-grade grease lubricates the intricate network of gears, ensuring smooth, powerful operation. Over time, or due to certain conditions, this grease can undergo a process called “separation.” Essentially, the solid and liquid components of the grease begin to split, allowing the lighter, oily part to escape its confines. This liquid then finds its way out of the mixer, often manifesting as drips or puddles.
Common Factors Contributing to Leaks
Several factors can contribute to this grease separation, accelerating the process and leading to those tell-tale oil leaks:
- Infrequent Use: If your KitchenAid mixer sits idle for extended periods, the grease inside can settle and separate. Regular use helps to keep the grease agitated and well-mixed, maintaining its integrity.
- Heavy Use and Overheating: While KitchenAid mixers are robust, continuous heavy-duty tasks or running the mixer for very long periods without breaks can generate excessive heat. This heat can break down the grease, causing it to separate more quickly.
- Age and Wear: Like any mechanical appliance, wear and tear are inevitable. Over many years, even with proper care, the grease can naturally degrade, and the seals designed to contain it might become less effective.
Is a Leaking KitchenAid Mixer Safe to Use?
One of the first questions many people ask is, “Is it safe to continue using my mixer if it’s leaking oil?” The good news is that the grease used in KitchenAid stand mixers is food-grade. This means that incidental contact with food is generally considered safe and won’t pose an immediate health risk. You might notice a slight discoloration if the oil drips into light-colored mixtures like whipped cream or frosting, but it shouldn’t be harmful.
However, while not immediately dangerous, a leaking mixer indicates that the internal gears are losing their necessary lubrication. This can lead to a decline in performance over time, causing the mixer to work harder, make unusual noises, or eventually fail. It’s also undeniably messy, detracting from the joy of baking. Therefore, while you don’t need to panic, addressing the leak is highly recommended for the longevity and optimal function of your appliance.
Preliminary Steps: What to Try Before Disassembly
Before you embark on the full repair process, which involves disassembling your mixer, there are a couple of simpler methods you can try. These might offer a temporary fix or even resolve minor leaks, especially if the separation is not severe.
- Run It on High Speed: If you’ve noticed only a small amount of oil or haven’t used your mixer in a while, try running it at its highest speed (speed 10) for about two minutes without any ingredients in the bowl. This action can sometimes help to redistribute the separated grease, mixing the oil back into the solid components and temporarily stopping the leak. After running, wipe away any visible excess oil.
- Allow Proper Cooling: If you tend to use your mixer for extended, heavy tasks, ensure you give it ample time to cool down completely between uses. Overheating can accelerate grease separation, so a cool-down period is a simple preventative measure.
These methods are worth trying for minor leaks, but for persistent or significant oil leakage, a more thorough repair is usually necessary.
The Full Repair: Replacing the Gearbox Grease (Step-by-Step Guide)
Replacing the grease in your KitchenAid mixer is a detailed process, but it’s well within the capabilities of a dedicated home repair enthusiast. By carefully following these steps, you can restore your mixer to its optimal, leak-free condition.
 Interior of a disassembled KitchenAid mixer showing gears covered in old, separated grease
Safety First & Tools You’ll Need
Before you begin any repair work, always ensure your KitchenAid mixer is unplugged from the power outlet. Safety is paramount when working with electrical appliances.
Here’s what you’ll typically need for this repair:
- Screwdrivers: Phillips head and flat-head (various sizes).
- Pin Punch and Hammer: For removing the planetary pin.
- Putty Knife or Spatula: For scooping out old grease and applying new.
- Clean Cloths and Food-Safe Degreaser: For thorough cleaning.
- Food-Grade Stand Mixer Grease: This is crucial. Do NOT use automotive or other industrial greases. Look for specifically formulated mixer grease.
- (Optional) New Gasket: Some models may benefit from replacing the gasket during this process.
- Container: To collect the old grease.
Disassembly: Accessing the Gearbox
The goal of this stage is to carefully dismantle the mixer head to expose the internal gears and their grease.
- Remove the Rear Housing Cover and Power Cord Strain Relief: Locate the single Phillips head screw on the mixer’s rear housing cover. Unscrew it and carefully remove the cover. Below it, you’ll find the power cord strain relief; gently pull this out to free the power cord from the motor.
- Remove the Planetary Drip Ring (Beauty Ring): This decorative ring is located just above where the attachments connect. Use a flat-head screwdriver to gently tap the drip ring off the planetary shaft. It’s typically held by friction.
- Tap Out the Planetary Pin: The planetary assembly is held in place by a pin. Using a small pin punch and a hammer, carefully tap this pin out of its hole.
- Pry Off the Planetary: With the pin removed, the planetary assembly can now be separated. Use a couple of flat-head screwdrivers to gently pry it off, then carefully pull it away by hand.
- Remove Gearbox Screws: With the planetary removed, you’ll see five screws around the gearbox area that hold the motor housing to the stand. Remove these with a flat-head screwdriver.
- Remove Rear Housing Screws: There are usually four more screws at the rear of the motor housing that also need to be removed. Note if any of these have a retaining washer, as it needs to go back in the same position during reassembly.
- Lift the Motor Housing Off the Stand: With all screws and the strain relief disengaged, the motor housing can now be lifted straight up off the lower half of the mixer. It may still feel somewhat attached as the front end of the housing is part of the gearbox that connects to a gear shaft. Lift gently but firmly.
Cleaning Out Old Grease
Once the gearbox is exposed, you’ll likely see a mass of grease. Inspect it: if it’s dark but consistent, it might be fine. If it’s clearly separated into oily liquid and solid chunks, then you’ve found your culprit.
- Remove All Old Grease: Using your putty knife or spatula, thoroughly scrape out all the old grease from around the gears and from inside the gearbox section of the motor housing. Place it in a disposable container. You may need to gently turn the gears (e.g., by inserting a pin punch into the bottom of the gear shaft and rotating) to access and clean all areas. This step is crucial for preventing future leaks and ensuring the new grease can do its job effectively.
Repacking with New Grease
Now for the satisfying part: giving your mixer a fresh start with new lubrication.
- Apply New Food-Grade Mixer Grease: It’s important to use roughly the same amount of new grease as you removed. Use a clean putty knife to generously apply the new food-grade grease onto and around all the exposed gears. Ensure every gear in the assembly gets good coverage. Again, you can gently turn the gears to help distribute the new grease evenly. The goal is to adequately lubricate all moving parts within the gearbox.
Reassembly: Putting Your Mixer Back Together
Carefully reverse the disassembly steps, ensuring all parts are correctly aligned and secured.
- Return the Motor Housing to the Mixer Stand: Carefully lower the motor housing back onto the stand. A bearing in the gearbox portion of the housing must align with a gear spindle.
- Seat the Motor Housing: The gears inside the gearbox must align for the housing to fully seat. You may need to gently apply pressure to the top of the housing while simultaneously turning the motor shaft (e.g., using a pin punch) to help the gears mesh and the housing descend into place.
- Return All Housing Fasteners: Replace the five screws beneath the planetary and the four screws in the rear of the mixer housing. Remember to put the screw with the retaining washer back in its original rear-most position.
- Replace the Planetary: Apply a thin, even coat of fresh grease to the planetary gear before pressing the planetary assembly back onto the mixer. As you press it into place, you’ll likely need to align the planetary gears by gently turning the motor shaft.
- Reinstall the Planetary Pin: Align the pinholes in the planetary and the motor shaft. A small screwdriver can help with alignment. Once aligned, tap the planetary pin back into position with your hammer.
- Press the Beauty Ring Back On: Ensure the planetary area is clean and free of grease residue, as the beauty ring relies on tension to stay in place. Then, press it firmly back onto the mixer by hand.
- Replace the Rear Housing Cover: Re-engage the power cord strain relief, then replace the rear housing cover and secure it with its Phillips head screw.
With your mixer reassembled, give it a quick test run. You should hear smooth operation, and the unsightly oil leaks should be a thing of the past!
Preventing Future Oil Leaks
While you now know how to fix a leaking KitchenAid mixer, prevention is always the best approach. Here are some tips to keep your stand mixer running optimally and leak-free:
- Regular Use: The best way to prevent grease separation is to use your mixer regularly. Even if you’re not baking, a quick run on high speed for a couple of minutes once a month can help keep the grease agitated and mixed.
- Avoid Overloading: Be mindful of the mixer’s capacity and don’t consistently push it beyond its limits with extremely stiff doughs or oversized batches. Overloading generates excess heat.
- Allow for Cooling: If you perform consecutive heavy mixing tasks, allow your mixer to cool down completely between uses.
- Store Properly: Store your mixer in a clean, dry place where it won’t be exposed to extreme temperature fluctuations.
When to Call a Professional
While many KitchenAid mixer oil leaks can be a DIY fix, there are times when it’s best to seek professional help:
- Lack of Confidence: If you’re uncomfortable with disassembling mechanical appliances, a professional repair service is a safer option.
- Persistent Leaks: If you’ve followed the full repair guide and your mixer continues to leak, there might be a more complex underlying issue, such as a damaged seal that needs specialized replacement.
- Other Performance Issues: If your mixer is also exhibiting grinding noises, unusual smells, or a significant loss of power, a professional can diagnose and address these concerns comprehensively.
Buying Guide: Essential Stand Mixer Maintenance Parts
Keeping a small stock of specific items can ensure you’re always ready for basic KitchenAid mixer maintenance.
- Food-Grade Stand Mixer Grease: This is the most crucial item. Always purchase grease specifically designed for stand mixers to ensure it’s food-safe and has the correct viscosity for your appliance’s gears.
- Replacement Gaskets/Seals: While not always necessary, having a replacement planetary gasket on hand can be useful, especially if your mixer is older or if you suspect the original seal might be compromised.
- Basic Tool Kit: A set of Phillips and flat-head screwdrivers, a small hammer, and a pin punch are invaluable for various minor repairs and maintenance tasks.
“A well-maintained KitchenAid mixer isn’t just about longevity; it’s about preserving the joy and efficiency it brings to your kitchen. Don’t let a simple grease leak diminish that experience.” – Admin, Standmixerpro.com
Conclusion
A leaking KitchenAid mixer might seem daunting at first, but understanding that it’s primarily due to separated gearbox grease empowers you to take action. Whether you opt for a simple high-speed run or undertake a full grease replacement, you’re investing in the prolonged life and flawless performance of your culinary workhorse. By addressing the issue promptly and implementing preventative measures, you can ensure your mixer continues to be a reliable partner in countless delicious creations. So, take charge of your mixer’s health, and keep those gears turning smoothly!
What culinary masterpiece will you create now that your KitchenAid is leak-free?
Frequently Asked Questions
What type of grease does a KitchenAid mixer use?
KitchenAid mixers utilize a specific type of food-grade grease, typically a white, non-toxic, and heat-resistant lubricant designed for incidental food contact. It’s crucial to only use grease explicitly labeled for stand mixers or KitchenAid appliances when performing a re-grease. Using other types of grease can be unsafe or damage the mixer’s internal components.
How often should I re-grease my KitchenAid mixer?
There isn’t a strict schedule for re-greasing. It’s generally recommended when you notice oil leaking or if the mixer begins to sound unusually noisy or sluggish, indicating inadequate lubrication. Regular use can keep the grease mixed, but for mixers used very heavily or very infrequently, inspecting the grease every 5-10 years might be a good preventative measure.
Can I use regular grease in my KitchenAid mixer?
No, you absolutely should not use regular automotive or general-purpose industrial grease in your KitchenAid mixer. These greases are not food-grade and can contain toxic chemicals that could contaminate your food. Always use grease specifically formulated as “food-grade stand mixer grease” or “KitchenAid mixer grease” to ensure safety and proper functionality.