A stand mixer is a culinary powerhouse, transforming strenuous kitchen tasks into effortless feats. From perfectly kneaded doughs to ethereal meringues, this appliance can elevate your baking and cooking to new heights. However, even with such a reliable tool, common errors can sabotage your recipes and even damage your machine. Understanding these pitfalls and how to avoid them is key to unlocking your stand mixer’s full potential.
Ignoring the User Manual
|
Our Picks for the Best Stand mixer in 2026
As an Amazon Associate I earn from qualifying purchases.
|
||
| Num | Product | Action |
|---|---|---|
| 1 | Cuisinart SMD-50CRM Precision Pro 5.5-Quart Digital Stand Mixer with 12-Speeds, 3 Preprogrammed Food Prep Settings, Mixing Bowl, Chef's Whisk, Flat Mixing Paddle, Dough Hook, and Splash Guard, Cream |

|
| 2 | Cuisinart SMD-50BC Precision Pro 5.5-Quart Digital Stand Mixer With 12-Speeds, 3 Preprogrammed Food Prep Settings, Mixing Bowl, Whisk, Flat Mixing Paddle, Dough Hook, And Splash Guard, Silver Lining |
|
| 3 | Cuisinart SPI-50 Spiralizer, White |
|
| 4 | 3-IN-1 Electric Stand Mixer, 6.5QT Bowl 660W 10-Speed Kitchen Mixer, Household Food Mixers include Dough Hook, Beater and Whisk, Bread Cake Mixer for Baking and Most Home Cooks, Red |
|
| 5 | Cuisinart SMD-50GPH Precision Pro 5.5-Quart Digital Stand Mixer with 12-Speeds, 3 Preprogrammed Food Prep Settings, Mixing Bowl, Whisk, Flat Mixing Paddle, Dough Hook, and Splash Guard, Graphite |
|
| 6 | Kitchen in the box Stand Mixer,3.2Qt Mini Electric Food Mixer,6 Speeds Portable Lightweight Kitchen Mixer for Daily Use with Egg Whisk,Dough Hook,Flat Beater (Green) |
|
| 7 | Kitchen in the box Stand Mixer,3.2Qt Small Electric Food Mixer,6 Speeds Portable Lightweight Kitchen Mixer for Daily Use with Egg Whisk,Dough Hook,Flat Beater (Blue) |
|
| 8 | Kitchen in the box Stand Mixer,3.2Qt Small Electric Food Mixer,6 Speeds Portable Lightweight Kitchen Mixer for Daily Use with Egg Whisk,Dough Hook,Flat Beater (Black) |
|
| 9 | Cuisinart Stand Mixer, 12 Speeds, 5.5-Quart Mixing Bowl, Chef's Whisk, Flat Mixing Paddle, Dough Hook, and Splash Guard with Pour Spout, Silver Lining, SM-50BC, Silver Lining |
|
| 10 | Cuisinart SM-50G Precision Master 5.5-Quart 12-Speed Stand Mixer with Mixing Bowl, Chef's Whisk, Flat Mixing Paddle, Dough Hook, and Splash Guard with Pour Spout, Agave Green, Manual |
|
Many enthusiastic home bakers unbox their new stand mixer and immediately dive into a recipe, skipping the instruction manual. This is a crucial mistake. Your mixer’s manual contains vital information specific to your model, including its capacity, proper attachment usage, cleaning guidelines, safety warnings, and warranty details. Overlooking these instructions can lead to improper use, diminished performance, and potentially a voided warranty. Take the time to read it thoroughly; it’s an investment in your appliance’s longevity and your culinary success.
 A person thoughtfully reading the user manual for a new stand mixer.
Starting on the Highest Speed
It’s tempting to crank your mixer to top speed to get things done quickly, but this often leads to a messy kitchen and poorly mixed ingredients. Beginning at high speed can send dry ingredients like flour puffing out of the bowl and liquids splattering across your countertops. Beyond the mess, it can also strain your mixer’s motor, leading to premature wear and tear, especially when dealing with dense mixtures. Always start your stand mixer on the lowest speed, allowing ingredients to incorporate gently before gradually increasing the speed as needed.
Overfilling the Mixing Bowl
Stand mixer bowls often appear spacious, encouraging users to mix large batches. However, every bowl has a maximum capacity, and exceeding it is a recipe for disaster. An overfilled bowl prevents ingredients from mixing properly, leaving uncombined pockets at the bottom or sides. It also puts undue stress on the mixer’s motor, risking overheating and damage, and can result in ingredients spilling over the sides, creating a significant clean-up challenge. Always check your manual for the recommended capacity and work in smaller batches if your recipe exceeds it.
Neglecting Bowl-to-Beater Clearance
The distance between your attachment and the bottom of the mixing bowl, known as bowl clearance, is surprisingly critical. Over time, or with frequent use, this clearance can shift. If the attachment is too high, ingredients at the bottom won’t be incorporated effectively, leading to inconsistent textures. If it’s too low, the attachment can scrape against the bowl, causing an unpleasant noise and potential damage to both the bowl and the attachment. Periodically check and adjust your mixer’s clearance, usually via a small screw on the head, to ensure optimal mixing. A common test involves placing a dime in the bowl and observing its movement with the paddle attachment on low speed.
Forgetting to Scrape Down the Bowl
Even the most powerful stand mixers have blind spots. As ingredients mix, they tend to cling to the sides and bottom of the bowl, just out of reach of the attachment. This often results in streaks of unmixed flour, butter, or other components, compromising the final texture and consistency of your recipe. Make it a habit to stop your mixer periodically, raise the head, and use a flexible rubber spatula to scrape down the sides and bottom of the bowl, ensuring all ingredients are thoroughly combined. Remember to always turn off the mixer before scraping to prevent injury or damage to your utensil.
Using the Wrong Attachment
Most stand mixers come with three primary attachments: the wire whisk, flat beater (or paddle), and dough hook, each designed for a specific purpose.
- The wire whisk is ideal for incorporating air, perfect for whipping egg whites, cream, or light batters for meringues and soufflés.
- The flat beater is your versatile workhorse, excellent for creaming butter and sugar, mixing cake batters, cookie doughs, and even mashing potatoes.
- The dough hook is specifically engineered for kneading yeast doughs like bread, pizza, or pasta, mimicking hand kneading to develop gluten effectively.
Using the wrong attachment can lead to overmixing, undermixing, or even damage to the attachment itself.
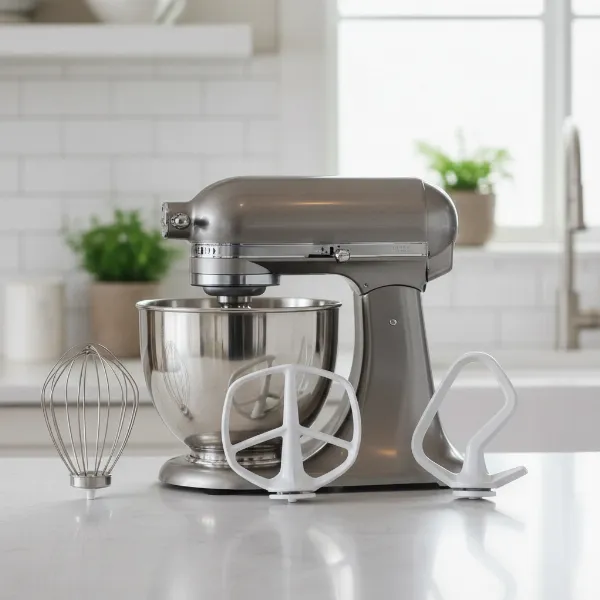 Three common stand mixer attachments: whisk, flat beater, and dough hook.
Adding All Ingredients Simultaneously
While a stand mixer offers hands-free convenience, it’s not a magical cauldron where all ingredients can be dumped in at once. Adding all dry or wet ingredients simultaneously, especially at the start, can create a chaotic mess with ingredients flying out. More importantly, it can hinder proper incorporation, leading to lumpy batters or overdeveloped gluten. Instead, follow recipe instructions for gradual additions, especially for dry ingredients, allowing each addition to be partially mixed before adding the next. This ensures a smoother, more uniform mixture.
Leaving Your Mixer Unattended While Running
The “hands-free” aspect of a stand mixer is a huge advantage, but it doesn’t mean “unattended.” Stand mixers, especially when working with dense doughs, can sometimes wobble or “walk” across the countertop. Leaving it unsupervised risks the mixer falling off the counter, causing significant damage to the appliance, your kitchen, and potentially serious injury. Always stay in the kitchen and monitor your mixer while it’s in operation, ready to intervene if it becomes unstable or if you notice any issues with the mixture.
Neglecting to Chill Bowls and Attachments (When Necessary)
While many baking recipes call for room-temperature ingredients, some benefit greatly from a chilled environment. For instance, achieving light and fluffy whipped cream requires cold heavy cream, and chilling your mixing bowl and whisk attachment beforehand can significantly improve the result. The cold helps the dairy fats trap air bubbles more effectively. Ignoring this step for temperature-sensitive recipes can lead to disappointing, slack results. A quick 5-10 minutes in the freezer for your bowl and whisk can make all the difference.
Plugging Your Mixer Into a Power Strip
Stand mixers are powerful appliances that draw a significant amount of electricity. Plugging them into a power strip, especially one shared with other devices, can easily overload the strip. This poses a serious risk of short-circuiting, melting outlets, or even a fire. Furthermore, most stand mixer warranties won’t cover damage caused by improper power sources. Always plug your stand mixer directly into a dedicated wall outlet to ensure it receives adequate power safely.
Improper Cleaning and Storage
The final steps after baking are often rushed, but neglecting proper cleaning and storage can drastically shorten your stand mixer’s lifespan and affect future recipes. Food residue, if left uncleaned, can harden, become unsanitary, and even transfer flavors to your next batch. Thoroughly clean the bowl and attachments after each use. While some bowls and attachments are dishwasher-safe, always check your manual – wire whisks, for example, often require handwashing to maintain their shape.
For the mixer body itself, unplug it, then wipe it down with a damp cloth, paying attention to crevices where ingredients might accumulate. Never immerse the motor head in water. For storage, keep the mixer upright and consider a cover if it’s not used frequently to protect it from dust. Store attachments within the bowl or in a nearby drawer so they are always accessible and not prone to getting lost or damaged.
By understanding and avoiding these common Stand Mixer mistakes, you’ll ensure your appliance performs optimally, your kitchen stays cleaner, and your recipes consistently turn out perfect.