A stand mixer is a culinary workhorse, but a wobbling head can turn baking into a frustrating, even messy, experience. Beyond the annoyance, a loose mixer head can impact performance, leading to uneven mixing and premature wear on components. Fortunately, many common wobbling issues can be resolved by simply tightening a few screws. This guide will walk you through the process, helping you restore stability to your essential kitchen appliance.
Understanding the Wobble: Tilt-Head vs. Bowl-Lift Mixers
Before diving into repairs, it’s helpful to identify your mixer type, as the relevant screws and adjustment points differ between tilt-head and bowl-lift models.
- Tilt-Head Mixers: These mixers feature a head that tilts back to allow access to the bowl and attachments. Wobble often stems from a loose hinge pin or incorrect beater-to-bowl clearance.
- Bowl-Lift Mixers: With these models, the bowl is secured and then lifted into place by a lever. Wobbling in these mixers is typically due to loose structural screws connecting the head to the stand.
Always unplug your mixer from the power source before beginning any inspection or repair to ensure safety.
Fixing a Wobbling Tilt-Head Mixer
Tilt-head mixers have a few key areas to check when the head begins to wobble.
Method 1: Tightening the Hinge Pin Set Screw
If your mixer head has a general side-to-side or front-to-back play where it connects to the base, the hinge pin set screw is often the culprit. Over time and with vigorous use, this screw can loosen.
Tools You’ll Need:
- Flathead screwdriver
- Padded work surface (a towel or mat)
|
Our Picks for the Best Stand mixer in 2026
As an Amazon Associate I earn from qualifying purchases.
|
||
| Num | Product | Action |
|---|---|---|
| 1 | Kitchen in the box Stand Mixer,3.2Qt Mini Electric Food Mixer,6 Speeds Portable Lightweight Kitchen Mixer for Daily Use with Egg Whisk,Dough Hook,Flat Beater (Green) |

|
| 2 | Cuisinart SMD-50CRM Precision Pro 5.5-Quart Digital Stand Mixer with 12-Speeds, 3 Preprogrammed Food Prep Settings, Mixing Bowl, Chef's Whisk, Flat Mixing Paddle, Dough Hook, and Splash Guard, Cream |
|
| 3 | Cuisinart SM-50G Precision Master 5.5-Quart 12-Speed Stand Mixer with Mixing Bowl, Chef's Whisk, Flat Mixing Paddle, Dough Hook, and Splash Guard with Pour Spout, Agave Green, Manual |
|
| 4 | 3-IN-1 Electric Stand Mixer, 6.5QT Bowl 660W 10-Speed Kitchen Mixer, Household Food Mixers include Dough Hook, Beater and Whisk, Bread Cake Mixer for Baking and Most Home Cooks, Red |
|
| 5 | Cuisinart SMD-50BC Precision Pro 5.5-Quart Digital Stand Mixer With 12-Speeds, 3 Preprogrammed Food Prep Settings, Mixing Bowl, Whisk, Flat Mixing Paddle, Dough Hook, And Splash Guard, Silver Lining |
|
| 6 | Cuisinart SPI-50 Spiralizer, White |
|
| 7 | Kitchen in the box Stand Mixer,3.2Qt Small Electric Food Mixer,6 Speeds Portable Lightweight Kitchen Mixer for Daily Use with Egg Whisk,Dough Hook,Flat Beater (Blue) |
|
| 8 | Cuisinart SMD-50GPH Precision Pro 5.5-Quart Digital Stand Mixer with 12-Speeds, 3 Preprogrammed Food Prep Settings, Mixing Bowl, Whisk, Flat Mixing Paddle, Dough Hook, and Splash Guard, Graphite |
|
| 9 | Cuisinart Stand Mixer, 12 Speeds, 5.5-Quart Mixing Bowl, Chef's Whisk, Flat Mixing Paddle, Dough Hook, and Splash Guard with Pour Spout, Silver Lining, SM-50BC, Silver Lining |
|
| 10 | Kitchen in the box Stand Mixer,3.2Qt Small Electric Food Mixer,6 Speeds Portable Lightweight Kitchen Mixer for Daily Use with Egg Whisk,Dough Hook,Flat Beater (Black) |
|
Steps:
- Unplug Your Mixer: Safety first! Ensure the mixer is completely disconnected from power.
- Prepare Your Workspace: Lay the mixer carefully on its side or invert it onto a clean, padded surface to protect its finish and provide better access to the underside.
- Locate the Hinge Pin and Set Screw: Look underneath the mixer, up inside the neck of the pedestal base, where the head pivots. You’ll find a silver hinge pin that runs through the base. There is typically a small flathead set screw designed to hold this pin snugly in place.
- Center the Hinge Pin: Check if the hinge pin has drifted out of place, appearing more exposed on one side than the other. Gently push the pin so it is centered and flush on both sides of the mixer body.
- Tighten the Set Screw: Using your flathead screwdriver, firmly tighten the set screw. Be careful not to overtighten, which could strip the threads, but ensure it’s snug enough to prevent the pin from moving.
- Test for Wobble: Return the mixer to its upright position, lower and lock the head. Gently try to move the head. The wobble should be significantly reduced or eliminated.
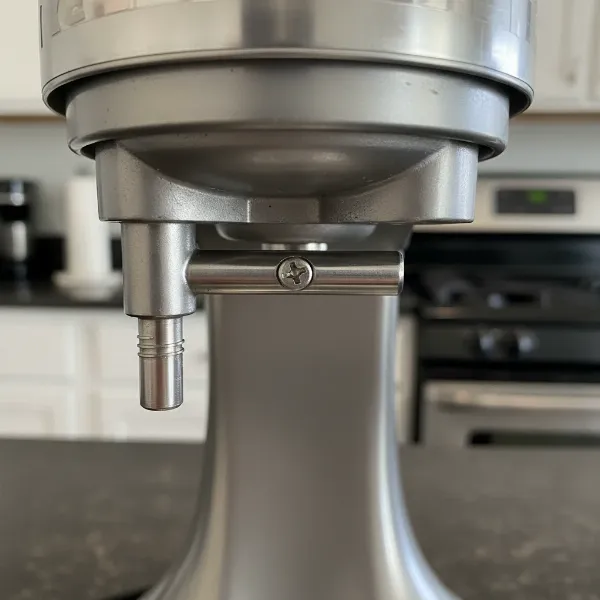 Close-up of a tilt-head stand mixer's underside, showing the hinge pin and set screw.
Method 2: Adjusting Beater-to-Bowl Clearance (The “Dime Test”)
Sometimes, a perceived wobble is actually the mixer shaking due to improper beater-to-bowl clearance. If the beater is too high or too low, it can cause the entire unit to vibrate or appear unstable, especially when mixing thicker batters.
Tools You’ll Need:
- Flathead screwdriver
- A dime
- Your mixer’s flat beater attachment and mixing bowl
Steps:
- Unplug Your Mixer: Always start with this crucial safety step.
- Attach Beater and Bowl: Place your mixing bowl securely onto the mixer and attach the flat beater.
- Perform the Dime Test: Drop a dime into the bottom of the empty mixing bowl. Lower the mixer head and lock it into place.
- Initial Mixer Test: Turn the mixer on to its lowest speed (speed 1). Observe how the beater interacts with the dime.
- If the beater doesn’t touch the dime at all: The beater is too high.
- If the beater pushes the dime around too vigorously: The beater is too low.
- Ideal Clearance: The beater should gently push the dime about an inch around the bottom of the bowl with each rotation.
- Locate the Adjustment Screw: Lift the mixer head back. On the neck of the mixer, typically near the top of where the beater attaches, you’ll find a small flathead adjustment screw.
- Adjust the Screw:
- To raise the beater (if it’s too low), turn the screw slightly counter-clockwise.
- To lower the beater (if it’s too high), turn the screw slightly clockwise.
- Make very small adjustments (e.g., a quarter turn at a time).
- Re-Test and Fine-Tune: Lower the head, lock it, and repeat the dime test. Continue adjusting the screw and re-testing until you achieve the ideal beater clearance. Be cautious not to over-adjust, as this can affect the locking mechanism of the head.
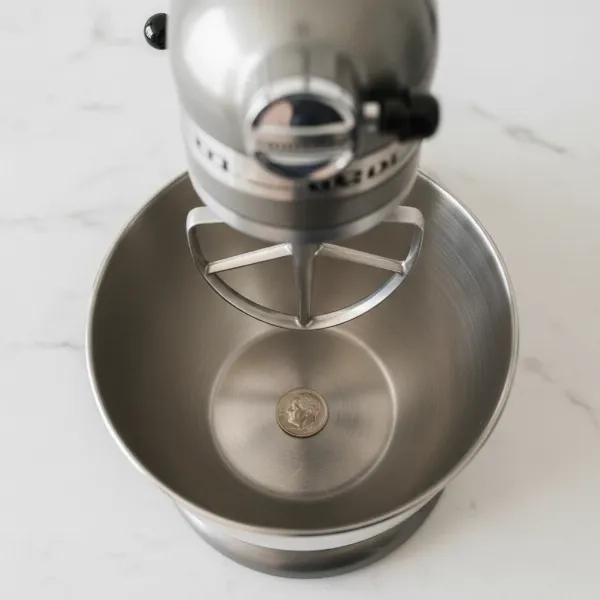 Stand mixer performing the dime test, showing a beater gently pushing a dime in a mixing bowl.
Addressing Wobble in Bowl-Lift Mixers
Bowl-lift mixers can develop wobble if the internal connecting screws between the head and the stand become loose. This repair is typically more involved than with tilt-head models, as it requires opening the mixer’s casing.
Tools You’ll Need:
- Phillips head screwdriver
- Flathead screwdriver
- Small bowl or container for screws
- Clean, dry work area
Steps:
- Unplug the Mixer: Absolutely essential for safety.
- Disassemble the Mixer Head Casing:
- Locate and remove the screw on the back of the mixer head.
- Carefully remove any metal bands or trim pieces held in place by that screw.
- Remove any screws on the sides or front of the mixer head that hold the casing together.
- Gently lift the top portion of the head casing off and set it aside in a safe place. You will now see the internal components, including the motor and gear assembly.
- Access Internal Connecting Screws: The primary screws that secure the head to the stand are often located underneath the motor and gear assembly. You will need to carefully remove the screws holding down the motor, the circuit control board, and the gear assembly casing.
- Carefully Move Components: Gently lift and move the motor and circuit board to the side just enough to expose the three large connecting screws that anchor the head unit to the stand.
- Tighten the Screws: Using a Phillips head screwdriver, firmly tighten these three connecting screws.
- Reassemble the Mixer: Carefully place the motor, circuit board, and gear assembly casing back into their original positions. Ensure all wires are clear of screw points and pinch hazards. Replace all screws, then reattach the top casing, metal band, and exterior screws.
- Test the Mixer: Once fully reassembled, plug in the mixer and turn it on to a low speed (without a bowl or attachments) to ensure it operates smoothly and the wobble is gone.
General Tips for Mixer Maintenance
- Always Unplug: Before any adjustment or repair, disconnect your mixer from power.
- Use Correct Speeds: When kneading heavy doughs, use only speeds 1 or 2. Higher speeds can put excessive strain on the mixer’s components, leading to loosening screws and increased wobble over time.
- Avoid Overtightening: While you want screws snug, overtightening can strip threads, making future adjustments or repairs more difficult and potentially causing damage.
- Consider Loctite (Blue): For screws that repeatedly come loose, a tiny drop of blue Loctite (a threadlocker) on the threads can help keep them secure. Use sparingly and with caution, as it can make future disassembly harder.
- When to Seek Professional Help: If you’ve followed these steps and your mixer head still wobbles, or if you’re uncomfortable performing the internal disassembly, it might be time to consult a qualified appliance repair technician.
A stable mixer head is crucial for efficient and enjoyable baking. By understanding the common causes and knowing how to tighten the appropriate screws, you can easily maintain your Stand Mixer and extend its lifespan for many years of culinary creations.