Imagine a spread for your toast so fresh, so rich, and so full of flavor that it elevates every bite. That’s the joy of homemade butter, and with the power of your stand mixer, it’s surprisingly simple to achieve. Forget store-bought; mastering this kitchen skill not only promises a superior taste experience but also puts you in complete control of your ingredients, all from the comfort of your kitchen.
The Magic Behind Homemade Butter: Why and How It Works
Making butter is a culinary art rooted in a simple scientific principle: fat separation. Heavy cream consists of tiny fat globules suspended in water. When agitated vigorously, these fat globules collide, break their protective membranes, and clump together, eventually forming solid butter and separating from the remaining liquid, which is buttermilk. This transformation happens in stages, a delightful process to witness.
The benefits of making your own butter extend far beyond mere novelty. You gain unparalleled freshness, a richer, more nuanced flavor profile that store-bought varieties often lack, and the satisfaction of knowing exactly what goes into your food—no unnecessary additives or preservatives. Plus, you get a bonus ingredient: fresh, tangy buttermilk, perfect for baking light, fluffy pancakes or biscuits. A stand mixer makes this traditionally laborious process effortless, turning what was once a chore into a quick and enjoyable task.
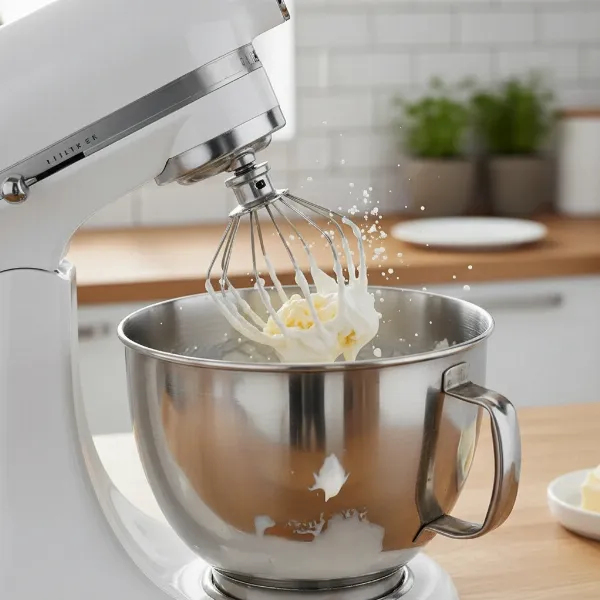 Stand mixer actively churning heavy cream into yellow butter, separating from buttermilk.
Essential Ingredients & Equipment for Butter Making
Before you begin your butter-making journey, gather a few key ingredients and pieces of equipment to ensure a smooth and successful process.
The Star Ingredient: Heavy Whipping Cream
|
Our Picks for the Best Stand mixer in 2026
As an Amazon Associate I earn from qualifying purchases.
|
||
| Num | Product | Action |
|---|---|---|
| 1 | Cuisinart Stand Mixer, 12 Speeds, 5.5-Quart Mixing Bowl, Chef's Whisk, Flat Mixing Paddle, Dough Hook, and Splash Guard with Pour Spout, Silver Lining, SM-50BC, Silver Lining |

|
| 2 | Kitchen in the box Stand Mixer,3.2Qt Small Electric Food Mixer,6 Speeds Portable Lightweight Kitchen Mixer for Daily Use with Egg Whisk,Dough Hook,Flat Beater (Blue) |
|
| 3 | Cuisinart SMD-50GPH Precision Pro 5.5-Quart Digital Stand Mixer with 12-Speeds, 3 Preprogrammed Food Prep Settings, Mixing Bowl, Whisk, Flat Mixing Paddle, Dough Hook, and Splash Guard, Graphite |
|
| 4 | 3-IN-1 Electric Stand Mixer, 6.5QT Bowl 660W 10-Speed Kitchen Mixer, Household Food Mixers include Dough Hook, Beater and Whisk, Bread Cake Mixer for Baking and Most Home Cooks, Red |
|
| 5 | Cuisinart SPI-50 Spiralizer, White |
|
| 6 | Cuisinart SM-50G Precision Master 5.5-Quart 12-Speed Stand Mixer with Mixing Bowl, Chef's Whisk, Flat Mixing Paddle, Dough Hook, and Splash Guard with Pour Spout, Agave Green, Manual |
|
| 7 | Cuisinart SMD-50BC Precision Pro 5.5-Quart Digital Stand Mixer With 12-Speeds, 3 Preprogrammed Food Prep Settings, Mixing Bowl, Whisk, Flat Mixing Paddle, Dough Hook, And Splash Guard, Silver Lining |
|
| 8 | Kitchen in the box Stand Mixer,3.2Qt Small Electric Food Mixer,6 Speeds Portable Lightweight Kitchen Mixer for Daily Use with Egg Whisk,Dough Hook,Flat Beater (Black) |
|
| 9 | Cuisinart SMD-50CRM Precision Pro 5.5-Quart Digital Stand Mixer with 12-Speeds, 3 Preprogrammed Food Prep Settings, Mixing Bowl, Chef's Whisk, Flat Mixing Paddle, Dough Hook, and Splash Guard, Cream |
|
| 10 | Kitchen in the box Stand Mixer,3.2Qt Mini Electric Food Mixer,6 Speeds Portable Lightweight Kitchen Mixer for Daily Use with Egg Whisk,Dough Hook,Flat Beater (Green) |
|
The foundation of excellent homemade butter is high-quality heavy whipping cream. Look for cream with a high fat content, typically 36% or more, often labeled as “heavy cream” or “heavy whipping cream.” Avoid products like “half-and-half” or “light cream” as they lack sufficient fat to churn into butter effectively. For best results, allow your cream to sit at room temperature for about 10-15 minutes before starting; slightly warmer cream can sometimes separate faster. A standard quart (32 ounces) of heavy cream will generally yield approximately one pound of butter and about two cups of fresh buttermilk.
Your Stand Mixer and Beyond
Your trusty stand mixer is the hero of this recipe. You will primarily use the whisk attachment for churning. Ensure your mixing bowl is clean and securely attached. To contain the inevitable splashes that occur during the process, a splash guard is highly recommended. If you don’t have one, a clean kitchen towel draped over the mixer will work wonders.
Beyond the mixer, you’ll need:
- A fine mesh strainer or cheesecloth to separate the butter from the buttermilk.
- A large bowl to collect the buttermilk.
- A spatula or your clean hands for pressing and washing the butter.
- Plenty of ice-cold water for rinsing.
- An airtight container or parchment paper for storing your finished butter.
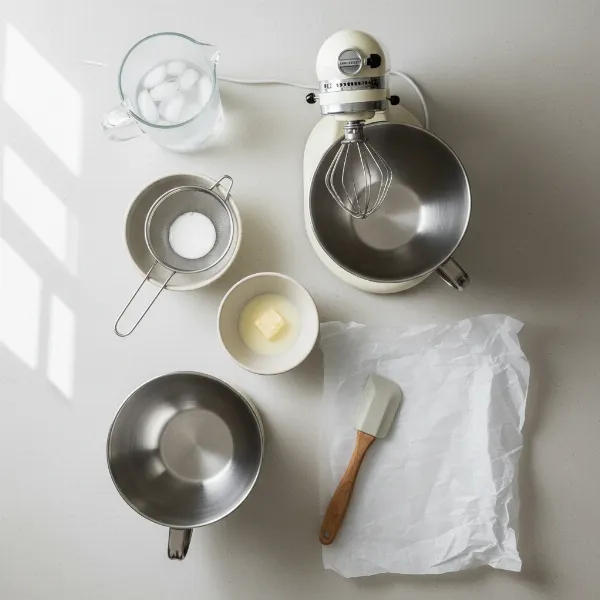 Essential tools for homemade butter, including stand mixer, whisk, strainer, and bowls.
Step-by-Step Guide to Churning Butter
Let’s walk through the simple yet magical process of transforming cream into golden butter.
Prepping Your Cream and Mixer
Start by ensuring your heavy whipping cream is at a slightly cool room temperature. Attach the whisk attachment to your stand mixer and pour the heavy cream into the mixing bowl. If you have a splash guard, now is the time to put it on. If not, have a clean kitchen towel ready to drape over the mixer once the cream starts to thicken.
The Churning Process: From Cream to Butter
Begin mixing on the lowest speed to prevent immediate splattering. Gradually increase the speed to medium-high (often speeds 6-8 on many stand mixers). The cream will go through several distinct stages:
- Whipped Cream (Soft Peaks): After a few minutes, the cream will thicken into soft, pillowy whipped cream.
- Stiff Peaks: Continue mixing, and the whipped cream will become stiffer, holding its shape firmly.
- Grainy and Lumpy: Keep going! The whipped cream will suddenly take on a grainy, slightly yellow appearance, and small lumps will begin to form. This is where things can get messy, so ensure your splash guard or towel is securely in place.
- Separation: Finally, the fat solids (butter) will clearly separate from the thin, milky liquid (buttermilk). You’ll often hear a distinct “sloshing” sound as the butter clumps together and moves freely in the buttermilk.
Once you see clear clumps of yellow butter and a thin, milky liquid, immediately turn off your stand mixer. Over-mixing at this stage can make the butter difficult to handle. This entire churning process typically takes between 5 to 10 minutes, though it can vary based on your mixer and cream.
Separating the Butter from Buttermilk
Carefully remove the whisk attachment (the butter will likely cling to it). Place a fine mesh strainer over a large bowl and pour the contents of your stand mixer bowl into the strainer. The buttermilk will drain into the bowl below, while the solid butter remains in the strainer. Be sure to reserve this fresh buttermilk; it’s excellent for baking or making marinades.
Washing Your Butter for Longevity
Washing the butter is perhaps the most crucial step for ensuring its quality and extending its shelf life. Any residual buttermilk trapped within the butter will cause it to spoil quickly and develop an off-flavor.
Transfer the butter back into your clean stand mixer bowl (or a separate large bowl). Add about ½ cup of ice-cold water. Using a spatula, or with clean hands, gently press and knead the butter against the sides of the bowl. You’ll see the water turn cloudy as more buttermilk is released. Drain the cloudy water. Repeat this washing process, adding fresh ice-cold water each time, until the water runs completely clear. This may take 3-5 changes of water.
After the final wash, use a piece of cheesecloth or a clean kitchen towel to squeeze out any remaining moisture. This final press ensures your butter is as dry as possible, minimizing the risk of spoilage. Many home butter makers find this step quite satisfying, often referring to it as the butter “crying” as the last milky droplets are pressed away.
Customizing and Storing Your Fresh Butter
One of the greatest advantages of making butter at home is the ability to tailor it precisely to your taste.
Adding Flavor to Your Homemade Butter
This is where your creativity can truly shine.
- Salted Butter: For classic salted butter, knead in ¼ to ½ teaspoon of fine-grain salt per pound of butter, or to taste, after the washing process.
- Herbed Butter: Mix in finely chopped fresh herbs like chives, parsley, rosemary, or thyme.
- Garlic Butter: Add minced garlic, often combined with parsley, for a savory spread perfect for bread or cooking.
- Sweet Butters: A touch of honey, cinnamon, or maple syrup can transform your butter into a delightful topping for pancakes, waffles, or sweet breads.
When adding flavorings, switch to the paddle attachment on your stand mixer if you want to ensure even distribution without overworking the butter. Mix on low speed just until combined.
Proper Storage for Peak Freshness
Once your butter is washed and flavored, it’s time to store it. You can shape it into a traditional log using parchment paper or use silicone butter molds for a professional look.
For immediate use, store your homemade butter in an airtight container or tightly wrapped in parchment paper in the refrigerator for up to one to two weeks. The exact duration depends on how thoroughly you’ve washed out the buttermilk. For longer storage, homemade butter freezes beautifully. Wrap it tightly in wax paper, then place it in a freezer bag or airtight container. It can be stored in the freezer for up to six months. Thaw frozen butter overnight in the refrigerator before using.
Troubleshooting Common Butter-Making Hiccups
Even seasoned bakers encounter occasional challenges. Here are a couple of common issues and their solutions:
- Cream Not Separating: The most common reason is that the cream either doesn’t have enough fat content (avoid half-and-half) or it’s too cold. Ensure you’re using heavy whipping cream and let it come to a slightly warmer room temperature before churning.
- Excessive Splatter: This is a universal experience, especially as the cream transitions from stiff peaks to separating butter. Always use a splash guard or drape a thick kitchen towel over your mixer to contain the mess. Gradually increasing the speed can also help.
Stand Mixer: Overview and Benefits
A stand mixer is a cornerstone appliance in any modern kitchen, transforming tedious manual tasks into effortless endeavors. It’s an electric mixer featuring a motor that drives various attachments while the mixing bowl remains stationary. Primarily known for its ability to mix, beat, whip, and knead, a stand mixer significantly reduces prep time and physical effort in baking and cooking. Its main uses range from whipping egg whites to light, fluffy meringues, creaming butter and sugar for cakes, to kneading dense bread doughs.
The history of stand mixers dates back to the early 20th century, with the first commercial stand mixer introduced by Hobart Manufacturing Company in 1919. These early innovations revolutionized professional bakeries and eventually made their way into home kitchens, evolving into the versatile machines we know today.
Today, the market offers several types of stand mixers:
- Tilt-Head Stand Mixers: These are common for home use, where the head tilts back to allow easy access to the bowl and attachments.
- Bowl-Lift Stand Mixers: Often preferred for larger capacities and heavier doughs, these models have a bowl that locks into place and is raised by a lever.
- Mini Stand Mixers: Compact versions suitable for smaller kitchens or single-serving recipes.
Guide to Choosing the Right Stand Mixer
Selecting the perfect stand mixer involves considering your culinary habits and kitchen needs. The right mixer can be a significant investment, so careful thought ensures you choose a model that serves you well for years.
Determining Your Usage Needs
First, ask yourself what you primarily need a stand mixer for:
- Baking Enthusiast: If you frequently bake cakes, cookies, and whipped desserts, a model with excellent whisking and creaming capabilities is key.
- Bread Maker: For those who love homemade bread, a robust motor and a sturdy dough hook are essential for handling heavy, sticky doughs.
- Frequency and Quantity: How often will you use it? Daily, weekly, or for occasional projects? Do you typically make small batches or large quantities for family gatherings? This dictates the required capacity and motor strength.
Capacity and Power
- Capacity: Stand mixer bowls typically range from 3.5 quarts to over 7 quarts. A 4.5-5 quart bowl is ideal for most home bakers, handling standard cake batter or a few loaves of bread. Larger families or serious bakers might benefit from 6-7 quart models.
- Power (Wattage): A higher wattage generally indicates a more powerful motor, which is crucial for tackling thick doughs without straining the machine. For regular use, look for mixers with at least 300 watts; avid bread makers might prefer 500 watts or more.
Important Features
Modern stand mixers come with a host of features designed to enhance your cooking experience:
- Mixing Speeds: A wide range of speed settings, often from slow stir to high whip, provides versatility for different recipes. Look for models with at least 6-10 speeds, plus a pulse function.
- Attachments: Most stand mixers come standard with a wire whisk (for whipping), a flat beater (for creaming and mixing), and a dough hook (for kneading). Many brands offer additional attachments like pasta makers, meat grinders, spiralizers, and ice cream makers, significantly expanding the mixer’s utility.
- Kneading Function: If you’re into bread making, ensure the dough hook is robust and the motor can handle prolonged kneading without overheating.
- Timer Function: Some advanced models include a built-in timer, allowing for precise mixing durations, which is especially useful for delicate tasks.
Brands and Price
Numerous reputable brands offer stand mixers, each with its unique selling points. KitchenAid is perhaps the most iconic, known for its durability, wide range of colors, and extensive attachment ecosystem. Other popular brands include Bosch, Cuisinart, Kenwood, and Smeg, each offering competitive features and designs.
Prices vary widely based on brand, capacity, power, and features, ranging from under $200 for entry-level models to over $500 for professional-grade machines. Consider your budget alongside your usage needs; investing in a more powerful and durable model often pays off in the long run if you’re a frequent user.
So Much More Than Butter: Stand Mixer Usage and Maintenance Tips
To maximize your stand mixer’s lifespan and ensure safe operation, a few guidelines are essential.
Safe Usage
- Stable Surface: Always operate your stand mixer on a flat, stable counter to prevent movement or tipping during heavy mixing.
- Read the Manual: Familiarize yourself with your specific model’s instructions, especially regarding speed settings for different tasks and attachment compatibility.
- Proper Attachment: Ensure the correct attachment is securely installed for the task at hand.
- Avoid Overloading: Do not exceed the manufacturer’s recommended capacity for ingredients, especially for dense doughs, to prevent motor strain.
- Unplug When Not in Use: Always unplug the mixer before attaching or detaching accessories, scraping the bowl, or cleaning to prevent accidental activation.
Cleaning and Maintenance
Regular cleaning and maintenance will keep your stand mixer performing optimally:
- Immediate Cleaning: Clean the bowl and attachments immediately after each use. Most stainless steel bowls and standard attachments (whisk, beater, dough hook) are dishwasher safe, but always check your manual.
- Wipe Down Unit: Wipe the main mixer unit with a damp cloth to remove any splatters or dust. Never submerge the motor head in water.
- Dry Thoroughly: Ensure all parts are completely dry before reassembling or storing to prevent water spots or rust.
- Regular Checks: Periodically inspect the power cord for any damage and ensure all parts are in good working order.
Mua Stand Mixer Ở Đâu? (Where to Buy a Stand Mixer?)
Finding the perfect stand mixer is easier than ever with various purchasing options available.
- Reputable Appliance Stores: Major electronics and home appliance retailers often have a wide selection of stand mixers on display. This allows you to see different models, compare sizes, and sometimes even test them. Sales associates can also provide expert advice.
- Online Retailers: Websites like Amazon, Best Buy, and the manufacturers’ official sites (e.g., KitchenAid.com) offer an extensive range, competitive pricing, and often user reviews that can be invaluable in making a decision. Pay attention to shipping costs and return policies when buying online.
- Department Stores: Many large department stores feature a kitchenware section with popular stand mixer brands. Look out for seasonal sales.
When buying online, pay close attention to the model number, specifications, and customer reviews. Always verify the warranty and return policy before making a purchase.
Buying Guide: Elevating Your Home Baking with the Right Stand Mixer
Choosing a stand mixer is a decision that can significantly impact your culinary journey. To summarize, consider these crucial factors:
- Your Primary Use: Are you a casual baker, a bread enthusiast, or a versatile cook?
- Capacity: Match the bowl size to your typical batch sizes.
- Power: Opt for higher wattage for heavier tasks like kneading dough.
- Key Features: Prioritize features like variable speeds, essential attachments, and potential expandability with additional accessories.
- Brand Reputation & Price: Balance your budget with a brand known for durability and good customer support.
Remember, a stand mixer is more than just a convenience; it’s an investment in your passion for creating delicious food. Take your time, do your research, and you’ll find a kitchen companion that empowers you to explore new recipes and techniques with confidence.
“A stand mixer isn’t just a tool; it’s an extension of your culinary creativity, unlocking possibilities you never knew existed in your kitchen.” – Admin, Standmixerpro.com
What delicious creations will you whip up first with your newfound Stand Mixer skills?
Frequently Asked Questions
How long does homemade butter last?
Homemade butter, when properly washed to remove all buttermilk and stored in an airtight container in the refrigerator, typically lasts for one to two weeks. For longer storage, it can be frozen for up to six months.
What kind of cream should I use to make butter?
Always use heavy whipping cream or heavy cream with a fat content of at least 36%. Products like half-and-half or light cream do not contain enough fat to successfully churn into butter.
Can I freeze homemade butter?
Yes, homemade butter freezes exceptionally well. Wrap it tightly in parchment paper and then place it in a freezer-safe bag or container. It can be stored in the freezer for up to six months.
Why is washing butter important?
Washing the butter with ice-cold water is crucial to remove any residual buttermilk. If buttermilk remains, it will cause the butter to spoil quickly and develop an unpleasant, rancid flavor.
What can I do with the leftover buttermilk?
The fresh buttermilk is a fantastic byproduct! It can be used in various baking recipes like pancakes, biscuits, muffins, or cornbread, adding a tangy flavor and tender texture. It can also be used in marinades.