Your KitchenAid stand mixer is a culinary workhorse, an indispensable tool for bakers and home chefs alike. But what happens when that familiar hum turns into a grinding protest, and your mixer’s attachments refuse to spin? More often than not, a stripped worm gear is the culprit, designed to be the sacrificial component that protects the motor from severe damage. Instead of relegating your beloved appliance to the junk pile, a DIY repair is entirely possible, saving you money and extending the life of your KitchenAid stand mixer. This detailed guide will walk you through everything you need to know, from diagnosing the problem to step-by-step replacement and essential maintenance tips.
Understanding Your KitchenAid Stand Mixer’s Worm Gear
The worm gear is a critical component located within your KitchenAid mixer’s transmission system. Its primary function is to transfer power efficiently from the motor to the planetary gear, which in turn rotates your attachments. Essentially, it’s the link that ensures your dough hooks knead, your whisks whip, and your flat beaters mix.
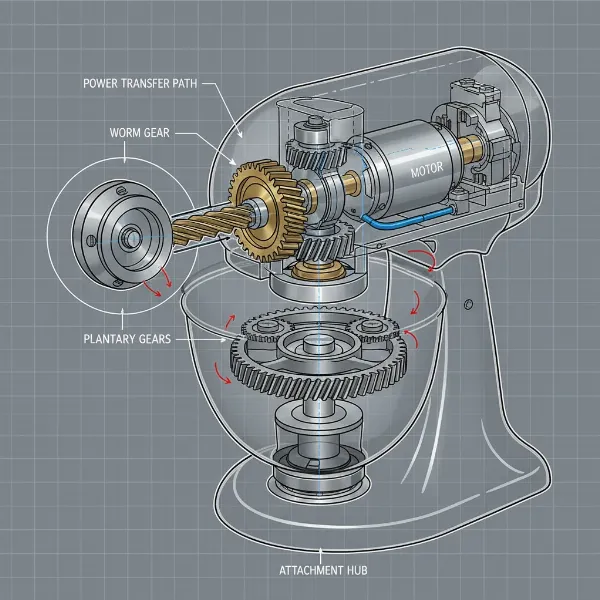 Diagram of a KitchenAid stand mixer's internal transmission showing the worm gear.
Common Symptoms of a Stripped Worm Gear
Identifying a stripped worm gear early can prevent further damage. Pay attention to these tell-tale signs:
- Unusual Noises: A grinding, squeaking, or clicking sound often indicates that the gear teeth are worn or broken.
- Attachments Not Spinning or Intermittent Movement: The motor might run, and you can hear it working, but the attachments either don’t move at all or move sporadically and weakly.
- Mixer Refuses to Turn On (or operate effectively): While less common as a direct “on/off” issue, a severely damaged worm gear can prevent the planetary mechanism from engaging, making the mixer appear non-functional.
- Visible Damage: Upon disassembly, you may find visible damage such as shredded, chipped, or severely worn teeth on the plastic worm gear.
|
Our Picks for the Best Stand mixer in 2026
As an Amazon Associate I earn from qualifying purchases.
|
||
| Num | Product | Action |
|---|---|---|
| 1 | Cuisinart Stand Mixer, 12 Speeds, 5.5-Quart Mixing Bowl, Chef's Whisk, Flat Mixing Paddle, Dough Hook, and Splash Guard with Pour Spout, Silver Lining, SM-50BC, Silver Lining |

|
| 2 | 3-IN-1 Electric Stand Mixer, 6.5QT Bowl 660W 10-Speed Kitchen Mixer, Household Food Mixers include Dough Hook, Beater and Whisk, Bread Cake Mixer for Baking and Most Home Cooks, Red |
|
| 3 | Kitchen in the box Stand Mixer,3.2Qt Mini Electric Food Mixer,6 Speeds Portable Lightweight Kitchen Mixer for Daily Use with Egg Whisk,Dough Hook,Flat Beater (Green) |
|
| 4 | Cuisinart SPI-50 Spiralizer, White |
|
| 5 | Cuisinart SMD-50CRM Precision Pro 5.5-Quart Digital Stand Mixer with 12-Speeds, 3 Preprogrammed Food Prep Settings, Mixing Bowl, Chef's Whisk, Flat Mixing Paddle, Dough Hook, and Splash Guard, Cream |
|
| 6 | Cuisinart SM-50G Precision Master 5.5-Quart 12-Speed Stand Mixer with Mixing Bowl, Chef's Whisk, Flat Mixing Paddle, Dough Hook, and Splash Guard with Pour Spout, Agave Green, Manual |
|
| 7 | Cuisinart SMD-50GPH Precision Pro 5.5-Quart Digital Stand Mixer with 12-Speeds, 3 Preprogrammed Food Prep Settings, Mixing Bowl, Whisk, Flat Mixing Paddle, Dough Hook, and Splash Guard, Graphite |
|
| 8 | Kitchen in the box Stand Mixer,3.2Qt Small Electric Food Mixer,6 Speeds Portable Lightweight Kitchen Mixer for Daily Use with Egg Whisk,Dough Hook,Flat Beater (Blue) |
|
| 9 | Kitchen in the box Stand Mixer,3.2Qt Small Electric Food Mixer,6 Speeds Portable Lightweight Kitchen Mixer for Daily Use with Egg Whisk,Dough Hook,Flat Beater (Black) |
|
| 10 | Cuisinart SMD-50BC Precision Pro 5.5-Quart Digital Stand Mixer With 12-Speeds, 3 Preprogrammed Food Prep Settings, Mixing Bowl, Whisk, Flat Mixing Paddle, Dough Hook, And Splash Guard, Silver Lining |
|
Why Do Worm Gears Strip?
The worm gear in a KitchenAid mixer is typically made of a softer metal or durable plastic. This is not a design flaw but a deliberate engineering choice. It acts as a “fuse” for the mixer’s drivetrain. When your mixer is subjected to excessive strain, such as mixing overly thick dough or large quantities of ingredients, the worm gear’s teeth are designed to strip out. This prevents the more expensive motor or other crucial gears from being damaged, making the worm gear a relatively inexpensive and straightforward component to replace.
Before You Begin: Safety and Preparation
Before embarking on any appliance repair, safety should be your top priority. Proper preparation ensures a smooth and secure repair process.
Safety Precautions
- Disconnect Power: Always, always unplug your KitchenAid stand mixer from the power outlet before beginning any disassembly or repair work. This eliminates the risk of electric shock.
- Stable Workspace: Work on a clean, well-lit, and stable surface. A workbench with good lighting is ideal.
- Organize Parts: As you disassemble the mixer, keep screws, washers, and other small parts organized. Using small containers or a magnetic mat can prevent lost components.
Tools and Parts Required
Gathering all necessary tools and replacement parts beforehand will make the repair process more efficient.
- Phillips Head Screwdriver: For most general screws.
- Flat Head Screwdrivers (small and standard): Useful for prying, disconnecting tabs, and sometimes removing pins.
- Putty Knife or Scraper: To remove old, hardened grease.
- Soft-Headed Hammer (e.g., rubber mallet): For tapping covers back into place or gently seating pins.
- Ball-Peen Hammer: For more precise tapping, especially with punches.
- Drift Punches (3/32″ and 5/32″): Essential if your worm gear is secured by a roll pin that needs to be driven out.
- Snap Ring Pliers (optional): Some models might use snap rings.
- New Worm Gear: Ensure you purchase the correct replacement part for your specific KitchenAid model. Common OEM part numbers include WPW10112253 or W11086780.
- Food-Grade Grease: Essential for lubricating the new gear and other internal components. Do not use automotive grease; it’s not safe for kitchen appliances. Super Lube Machine Grease (41150/41160) is a commonly recommended option.
- Transmission Case Gasket (optional): Some repair kits may include this, or you may choose to replace it if it’s damaged.
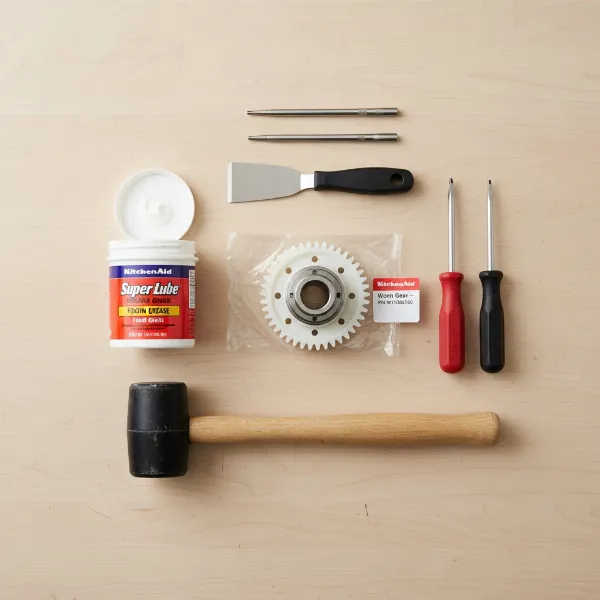 Essential tools and replacement parts for KitchenAid worm gear repair, including screwdrivers, punches, new gear, and grease.
Step-by-Step Guide to Replacing Your KitchenAid Worm Gear
This section provides a general overview. Always refer to a specific guide or video for your exact KitchenAid model as minor variations exist.
Disassembling Your KitchenAid Mixer
- Remove the Trim Band: For tilt-head models, you’ll typically start by removing the decorative trim band that goes around the head of the mixer. This might involve a single screw at the back.
- Access the Motor Housing: Locate and remove the screws holding the back cover and any side covers. There are usually four screws securing the main upper housing.
- Lift the Housing: Carefully lift the upper housing off the base. You may need to disconnect a speed control board or other electrical components. Use a small flathead screwdriver to gently release any tabs holding sensors in place.
Accessing and Removing the Old Worm Gear
- Clear Out Old Grease: Once the housing is open, you’ll likely see a significant amount of old grease. Use your putty knife or scraper to remove as much of it as possible. It’s important to clean out any plastic shards or metal fragments from the stripped gear.
- Locate the Worm Gear Assembly: The worm gear is typically found near the bottom of the motor housing, often held by a bracket.
- Remove the Worm Gear Bracket: Remove the three Phillips screws and washers that secure the worm gear bracket to the bottom cover.
- Extract the Worm Gear: Carefully pull the entire worm gear assembly up and off. If it’s secured by a roll pin, you’ll need to drive it out. Start with a 5/32″ punch to get the pin flush, then switch to a 3/32″ punch to drive it completely out, ensuring the gear and shaft don’t spin while you work.
Cleaning and Greasing
This step is crucial for the longevity of your new worm gear and overall mixer performance.
- Thorough Cleaning: Remove all traces of old, contaminated grease and any debris from the gears and the housing. Use a clean cloth.
- Apply New Grease: Liberally apply fresh food-grade grease to the new worm gear and all other gears in the assembly. Ensure an even coating on all teeth. It is imperative to regrease the entire machine when changing gears.
Installing the New Worm Gear
- Position the New Gear: Carefully place the new worm gear assembly onto the bottom cover, aligning the mounting holes.
- Secure with Screws/Pin: Reinstall the mounting screws and washers. If your model uses a roll pin, carefully align the new gear with the shaft and tap the pin back into place until it’s flush on both sides.
Reassembling Your KitchenAid Mixer
- Reconnect Electrical Components: If you disconnected any wires or circuit boards, carefully reattach them.
- Replace the Top Cover: Position the upper housing back onto the base, ensuring all wires are tucked away and connections are secure. Reinstall the housing screws.
- Reattach Trim and Covers: Replace the back cover and any decorative trim pieces.
- Final Inspection: Double-check all screws and connections to ensure everything is secure.
Troubleshooting Common Issues After Repair
Even with careful DIY repair, minor issues can arise.
- Mixer Still Not Working: If the mixer still doesn’t spin, double-check all electrical connections and ensure the speed control board is properly seated. Verify that the new worm gear is installed correctly and not binding.
- Unusual Noises Persist: If grinding or squeaking continues, it might indicate insufficient grease, incorrectly seated gears, or possibly damage to another gear that was not initially identified. Reopen the mixer and inspect all gears and grease application.
Maintaining Your KitchenAid Mixer to Prevent Future Stripping
Proactive maintenance can significantly extend the life of your KitchenAid stand mixer and prevent future worm gear failures.
- Avoid Overloading: This is the most common cause of stripped worm gears. Pay attention to your mixer’s capacity guidelines for different types of doughs and mixtures. If the motor sounds strained, reduce the load.
- Proper Cleaning: While not directly related to the worm gear, keeping the exterior clean prevents debris from entering the internal mechanisms.
- Regular Regreasing: Even if your mixer isn’t making unusual noises, consider a periodic regreasing every few years, especially with heavy use. Fresh grease ensures smooth operation and reduces friction that can lead to wear.
Buying Guide: Where to Find Genuine KitchenAid Worm Gear Parts
When replacing your worm gear, choosing a high-quality, genuine replacement part is crucial for performance and longevity.
- Official KitchenAid/Whirlpool Parts: The most reliable source for genuine OEM (Original Equipment Manufacturer) parts. You can often find them on the official KitchenAid website or through authorized service centers.
- Appliance Parts Retailers: Websites like Sears Parts Direct, eReplacementParts.com, AppliancePartsPros.com, and Fix.com specialize in appliance repair parts and often carry genuine or high-quality aftermarket worm gears specifically for KitchenAid.
- Online Marketplaces: Retailers such as eBay and Walmart also sell KitchenAid worm gears. When purchasing from these sites, always verify the seller’s reputation and ensure the part is compatible with your specific mixer model (e.g., KSM150PSWH0). Look for specific part numbers like WPW10112253 or W11086780.
“Replacing a stripped worm gear in a KitchenAid mixer is a common and rewarding DIY repair that can save you a significant amount compared to professional service. The key is patience, careful disassembly, thorough cleaning, and using the correct food-grade grease.” – Admin, Standmixerpro.com, Expert Stand Mixer Technician
Buying Guide: Summing Up Your KitchenAid Worm Gear Repair
Repairing a stripped worm gear in your KitchenAid Stand Mixer is a manageable project for most home mechanics. By understanding the symptoms, gathering the right tools and genuine parts, and following a methodical approach to disassembly and reassembly, you can successfully restore your mixer to full working order. Remember that the worm gear is designed to fail as a protective measure, highlighting the importance of not overloading your machine and ensuring regular maintenance, especially regreasing.
Don’t let a small, sacrificial gear spell the end for your beloved KitchenAid. With a little effort and this guide, you can tackle the repair with confidence. What’s the most challenging part of appliance repair you’ve ever faced?
Frequently Asked Questions
What are the main signs that my KitchenAid worm gear is stripped?
The most common signs include grinding or squeaking noises, the motor running but the attachments not spinning, or intermittent movement of the planetary head. Visible damage to the gear teeth upon inspection is a definitive sign.
What tools do I need for a KitchenAid worm gear replacement?
You’ll typically need Phillips and flathead screwdrivers, a putty knife for grease removal, hammers (soft-headed and ball-peen), and drift punches (3/32″ and 5/32″) if a roll pin secures the gear. Food-grade grease and the new worm gear are also essential parts.
Is replacing a KitchenAid worm gear a difficult DIY repair?
For individuals comfortable with basic hand tools and following instructions, replacing a KitchenAid worm gear is generally considered a straightforward DIY repair. Many online video tutorials offer step-by-step guidance for various models.
How often should I regrease my KitchenAid mixer?
While there’s no strict schedule, it’s recommended to inspect and regrease your KitchenAid mixer every few years, especially with heavy or frequent use. Always regrease whenever you open the mixer for any gear-related repair to ensure proper lubrication and remove old, contaminated grease.
Can I use any grease for my KitchenAid mixer?
No, it is critical to use only food-grade grease in your KitchenAid mixer. Automotive or other non-food-grade greases are not safe for appliances used for food preparation and can be harmful if they come into contact with ingredients.