Is your trusty stand mixer sputtering, losing power, or even sparking more than usual? Don’t toss it aside just yet! Often, the culprit is a pair of small, yet vital, components: the carbon brushes in its motor. As a seasoned technician with over a decade of experience, I’ve seen countless mixers brought back to life with this straightforward repair. This guide will walk you through everything you need to know, from recognizing the signs of wear to a step-by-step replacement process, helping you restore your mixer’s performance and extend its lifespan.
Understanding Carbon Brushes in Your Mixer Motor
Carbon brushes are critical components within your mixer’s universal motor. Their primary function is to conduct electrical current from the stationary parts of the motor (the stator) to the rotating part (the armature). This continuous transfer of electricity is what powers your mixer, allowing it to perform tasks from gently folding delicate ingredients to kneading heavy dough.
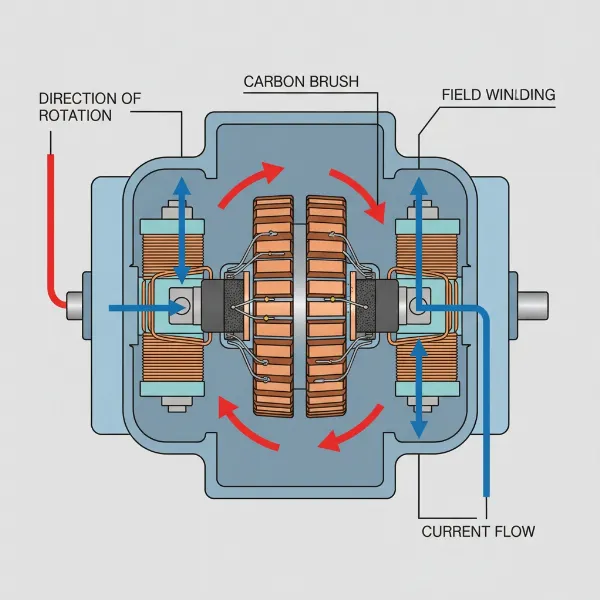 Diagram showing a carbon brush interacting with a commutator in a universal motor.
These brushes are designed to gradually wear down over time, acting as a sacrificial component to protect the more expensive parts of the motor, like the armature. As they rub against the commutator (a segmented ring on the armature), a fine carbon dust is produced, which also helps lubricate and improve electrical contact. However, this wear inevitably leads to them becoming too short or damaged to function effectively.
Signs Your Carbon Brushes Need Replacing
Spotting the symptoms of worn carbon brushes early can save you from more extensive damage to your mixer. Keep an eye out for these tell-tale signs:
- Reduced Performance or Intermittent Operation: Your mixer might struggle with tasks it once handled easily, or it may stop and start erratically during use. You might even find yourself needing to jiggle or tap the mixer to get it running.
- Excessive Sparking or Burning Smell: A small amount of sparking is normal, but if you notice significant, continuous sparking from the motor vents, or detect a distinct burning odor, it’s a strong indicator that the brushes are worn.
- Unusual Noises: Worn brushes can lead to grinding, rattling, or banging sounds coming from the motor. This occurs when the brushes can no longer maintain consistent contact with the commutator.
- Difficulty Starting: If your mixer hesitates to start or fails to turn on at all, worn brushes could be preventing the necessary electrical connection to the motor.
- Visible Wear: Upon inspection, old carbon brushes will appear significantly shorter than new ones, or they may show visible signs of chipping, crumbling, or a discolored spring. Many brushes have an “auto cut-off” line, indicating when replacement is due.
|
Our Picks for the Best Stand mixer in 2026
As an Amazon Associate I earn from qualifying purchases.
|
||
| Num | Product | Action |
|---|---|---|
| 1 | Kitchen in the box Stand Mixer,3.2Qt Small Electric Food Mixer,6 Speeds Portable Lightweight Kitchen Mixer for Daily Use with Egg Whisk,Dough Hook,Flat Beater (Black) |

|
| 2 | Cuisinart SM-50G Precision Master 5.5-Quart 12-Speed Stand Mixer with Mixing Bowl, Chef's Whisk, Flat Mixing Paddle, Dough Hook, and Splash Guard with Pour Spout, Agave Green, Manual |
|
| 3 | Kitchen in the box Stand Mixer,3.2Qt Small Electric Food Mixer,6 Speeds Portable Lightweight Kitchen Mixer for Daily Use with Egg Whisk,Dough Hook,Flat Beater (Blue) |
|
| 4 | Cuisinart Stand Mixer, 12 Speeds, 5.5-Quart Mixing Bowl, Chef's Whisk, Flat Mixing Paddle, Dough Hook, and Splash Guard with Pour Spout, Silver Lining, SM-50BC, Silver Lining |
|
| 5 | Cuisinart SPI-50 Spiralizer, White |
|
| 6 | Cuisinart SMD-50BC Precision Pro 5.5-Quart Digital Stand Mixer With 12-Speeds, 3 Preprogrammed Food Prep Settings, Mixing Bowl, Whisk, Flat Mixing Paddle, Dough Hook, And Splash Guard, Silver Lining |
|
| 7 | Cuisinart SMD-50CRM Precision Pro 5.5-Quart Digital Stand Mixer with 12-Speeds, 3 Preprogrammed Food Prep Settings, Mixing Bowl, Chef's Whisk, Flat Mixing Paddle, Dough Hook, and Splash Guard, Cream |
|
| 8 | Kitchen in the box Stand Mixer,3.2Qt Mini Electric Food Mixer,6 Speeds Portable Lightweight Kitchen Mixer for Daily Use with Egg Whisk,Dough Hook,Flat Beater (Green) |
|
| 9 | Cuisinart SMD-50GPH Precision Pro 5.5-Quart Digital Stand Mixer with 12-Speeds, 3 Preprogrammed Food Prep Settings, Mixing Bowl, Whisk, Flat Mixing Paddle, Dough Hook, and Splash Guard, Graphite |
|
| 10 | 3-IN-1 Electric Stand Mixer, 6.5QT Bowl 660W 10-Speed Kitchen Mixer, Household Food Mixers include Dough Hook, Beater and Whisk, Bread Cake Mixer for Baking and Most Home Cooks, Red |
|
The Importance of Timely Replacement
Ignoring the signs of worn carbon brushes can lead to more severe and costly issues. If worn brushes are left in place, they can damage the commutator on the motor’s armature. Repairing or replacing a damaged armature is significantly more expensive and complex than simply swapping out the brushes. By addressing the problem promptly, you not only restore your mixer’s optimal performance but also safeguard its longevity, ensuring it remains a reliable companion in your kitchen for years to come.
Essential Tools and Safety Precautions
Before you begin any repair on your stand mixer, gathering the right tools and prioritizing safety are paramount. This job is relatively simple, but a few precautions will ensure a smooth and safe process.
Tools You’ll Need:
- Flathead Screwdriver: Most mixer brush caps require a flathead screwdriver for removal. Sometimes, a smaller size is needed for specific models.
- Small Coin: For certain mixer models, particularly some KitchenAid stand mixers, a coin might fit the brush cap slot better than a screwdriver.
- Flashlight or Torch: A small light source will be helpful for inspecting the brush holders and ensuring correct alignment of the new brushes.
- Replacement Carbon Brushes: Crucially, ensure you have the correct replacement brushes for your specific mixer model. Brushes vary in size and shape, and using the wrong ones can cause damage.
- Optional: Work Gloves: While not strictly necessary for this repair, gloves can offer better grip and keep your hands clean.
Safety First:
Always prioritize your safety when working with electrical appliances.
- Unplug the Mixer: This is the most critical step. Absolutely ensure your mixer is disconnected from the power source before you touch any internal components.
- Stable Work Surface: Work on a clean, stable surface where your mixer won’t tip or slide, and where small parts won’t get lost.
- Beware of Springs: Carbon brushes are typically held in place by springs. When removing the caps, be prepared for the brushes to pop out slightly. Apply gentle, steady pressure.
Step-by-Step Guide: Replacing Your Mixer’s Carbon Brushes
Replacing carbon brushes is a quick and satisfying DIY repair. Follow these steps carefully to get your mixer back in top working order.
Step 1: Prepare Your Mixer
First, and most importantly, unplug your stand mixer from the wall outlet. Safety cannot be overstated when dealing with electrical appliances. Next, remove any attachments, such as beaters or dough hooks, and the mixing bowl itself. This will provide clear access to the mixer body. Locate the brush caps, which are typically small, slotted caps found on the sides of the mixer’s motor housing, often near the top or back. Most stand mixers have two, one on each side.
Step 2: Remove the Old Carbon Brushes
Using a flathead screwdriver or a small coin that fits snugly into the slot, carefully unscrew one of the brush caps. It’s important to exert firm, steady pressure to avoid stripping the plastic cap. As you loosen the cap, be cautious; the carbon brush underneath is spring-loaded and may want to pop out quickly. Hold onto the cap as you finish unscrewing to prevent it from flying off. Once the cap is removed, gently pull out the old carbon brush. Take a moment to examine it; you’ll likely notice it’s significantly shorter, perhaps chipped or unevenly worn, compared to a new brush. Repeat this process for the brush on the opposite side of the mixer.
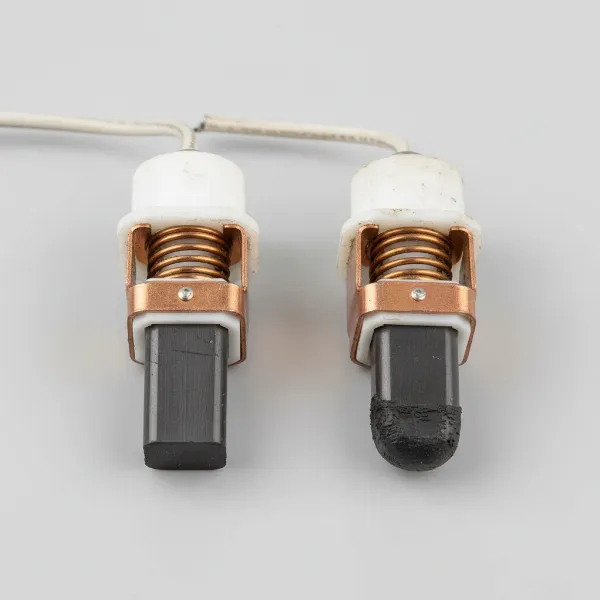 Side-by-side comparison of a new carbon brush and a significantly worn carbon brush for a stand mixer.
Step 3: Install the New Carbon Brushes
This step requires attention to detail, especially regarding the orientation of the new brushes. Many carbon brushes, particularly for KitchenAid mixers, have a specific shape – often a flattened corner, a beveled edge, or a “dog ear” tag. This unique shape must align with a corresponding notch or contour within the brush holder to ensure proper seating and electrical contact. Use your flashlight to peer into the brush holder and identify this alignment point.
Carefully insert a new carbon brush into the holder, making sure its specific shape matches the internal contours. Gently push the brush in against the spring tension until it sits flush within the holder. Always replace both carbon brushes, even if only one appears visibly worn, as they tend to wear out at similar rates, and replacing them in pairs ensures balanced performance.
Step 4: Reassemble and Test
With the new carbon brushes properly seated, screw the brush caps back into place securely. Ensure they are snug but do not overtighten, as this could damage the plastic threads. Once both caps are reinstalled, plug your mixer back into a power outlet. Turn your mixer on, starting at the lowest speed and gradually increasing it through all settings. Listen for smooth motor operation, and check for the absence of excessive sparking or unusual noises. Your mixer should now run with renewed vigor and consistency.
Pro Tips for Mixer Maintenance and Longevity
Regular care and attention can significantly extend the life of your Stand Mixer, preventing the need for frequent repairs like carbon brush replacement.
- Regular Checks: Consider performing a quick visual inspection of your carbon brushes every few years, or if you start noticing any of the common symptoms of wear. This proactive approach can help you catch issues before they escalate.
- Quality Replacements: Always use genuine manufacturer parts or high-quality, reputable aftermarket replacements that are specifically designed for your mixer model. Cheap or ill-fitting brushes can cause more harm than good.
- Cleanliness is Key: While you shouldn’t disassemble your mixer regularly, keeping the exterior clean and free of dust and debris can prevent buildup from interfering with ventilation or brush cap access.
- Know Your Mixer: Refer to your mixer’s owner’s manual for specific instructions regarding maintenance and parts. Each model might have slight variations in brush cap design or replacement procedure.
Buying Guide: Finding the Right Carbon Brushes
Choosing the correct replacement carbon brushes is crucial for a successful repair and the continued health of your mixer. Here’s what to keep in mind when purchasing:
- Matching Your Mixer Model: The most important factor is compatibility. Carbon brushes are not universal; they vary significantly in size, shape, and lead wire length depending on the mixer’s make and model. Always check your mixer’s model number and cross-reference it with the part number for the brushes.
- Where to Buy: You can typically find replacement carbon brushes through several reliable sources:
- Manufacturer Websites: Many mixer brands sell replacement parts directly.
- Appliance Parts Retailers: Specialized stores for appliance parts often stock a wide range of brushes.
- Online Marketplaces: Reputable online platforms carry various brands; just be sure to verify seller reviews and product descriptions.
- What to Look For:
- Dimensions and Shape: Confirm that the new brushes match the dimensions and unique shape (e.g., flattened corner, beveled edge) of your old brushes.
- Material Quality: Opt for brushes made from high-grade carbon and copper for optimal conductivity and longevity.
- “Auto Cut-Off” Feature: Some modern carbon brushes feature a built-in “auto cut-off” mechanism that stops the motor when the brush wears down past a certain point, protecting the armature. This is a good feature to look for if available for your model.
Buying Guide: Total Experience for a Seamless Replacement
In addition to finding the right brushes, consider the overall purchasing experience. Look for retailers that offer clear product descriptions, compatibility charts, and good customer support. Reading reviews from other mixer owners can also provide valuable insights into the quality and fit of specific replacement brushes. Don’t hesitate to contact a parts specialist if you’re unsure about which brushes your mixer requires. A little extra research upfront can save you time and frustration later.
Replacing the carbon brushes in your mixer motor is a simple yet incredibly impactful repair. It’s a testament to the fact that even seemingly complex appliance issues can often be resolved with a bit of knowledge and a few basic tools. By understanding the role of these small components, recognizing the signs of wear, and following a straightforward replacement process, you can easily restore your mixer to its full potential. This DIY fix not only saves you money on professional repairs but also gives you the satisfaction of knowing you’ve extended the life of a valuable kitchen workhorse. So, go ahead and tackle this repair with confidence, knowing you’re preserving your investment and keeping your culinary adventures alive.
What delicious creations will you whip up next with your revitalized mixer?
Frequently Asked Questions
How often should I replace carbon brushes in my stand mixer?
There’s no fixed schedule for replacing carbon brushes; it primarily depends on how frequently you use your mixer and for what tasks. Heavy usage, especially with dense doughs, will cause them to wear faster. Generally, you should inspect them when you notice any of the performance issues mentioned earlier, or proactively every few years as part of a maintenance routine.
Can I use any carbon brush for my mixer?
No, you cannot use just any carbon brush. Mixer carbon brushes are model-specific, meaning they are designed to fit the exact dimensions, shape, and electrical requirements of your particular mixer. Using incorrect brushes can lead to improper contact, damage to your motor’s armature, or even complete mixer failure. Always match the replacement brushes to your mixer’s model number.
What happens if I don’t replace worn carbon brushes?
Failing to replace worn carbon brushes can lead to significant and costly damage to your mixer. Without proper contact, the motor’s armature can overheat and be permanently damaged, which is a much more expensive repair than replacing the brushes. In some cases, the mixer may stop working altogether, rendering it unusable until the issue is addressed.
Why do stand mixer carbon brushes have a specific shape?
Carbon brushes have a specific shape (e.g., a flattened corner or beveled edge) to ensure they seat correctly and make optimal electrical contact with the commutator inside the motor. This precise fit is essential for efficient power transfer and to prevent premature wear or damage to both the brushes and the commutator.