Every passionate baker or home cook knows the stand mixer is an indispensable ally in the kitchen, transforming demanding tasks into effortless culinary adventures. Yet, even the most robust machines can sometimes fall short, leaving unmixed ingredients at the bottom of the bowl or, worse, creating jarring scraping noises. If your whipped cream isn’t fluffy enough or your dough remains stubbornly uncombined, the culprit might not be your recipe, but a simple misalignment in your stand mixer. The good news? An easy, time-honored technique known as the “dime test” can resolve these issues, ensuring your stand mixer operates at its peak performance. This guide will walk you through why proper calibration is crucial, how to perform the dime test, interpret its results, and make precise adjustments, bringing professional-level mixing consistency to your kitchen.
The Stand Mixer: An Overview and Its Benefits
The stand mixer has revolutionized baking and cooking, transitioning many tasks from laborious handwork to automated efficiency. At its core, a stand mixer is an electric appliance designed to mechanize the whisking, mixing, and kneading of food. Early models, though rudimentary, paved the way for the powerful, versatile machines we rely on today, saving countless hours and ensuring more consistent results.
Modern stand mixers come primarily in two types: tilt-head and bowl-lift models. Tilt-head mixers allow the head of the mixer to tilt back, providing easy access to the bowl and attachments. Bowl-lift models, often preferred for larger capacities and heavier doughs, feature a lever that raises and lowers the bowl into mixing position. Both designs offer a range of benefits, from effortlessly creaming butter and sugar to thoroughly kneading dense bread doughs and whipping delicate meringues. Their robust motors and various attachments (paddle, dough hook, wire whip) make them a cornerstone for any serious culinary endeavor.
Understanding Beater-to-Bowl Clearance and Why It Matters
The concept of “beater-to-bowl clearance” refers to the precise distance between the bottom and sides of your mixer’s attachment (like the flat beater) and the inner surface of the mixing bowl. This seemingly minor detail is, in fact, critical for your stand mixer’s performance and longevity.
Proper clearance ensures that your ingredients are mixed uniformly and thoroughly. If the beater is set too high, it will miss a thin layer of ingredients at the bottom and sides of the bowl, leading to unmixed pockets of flour, sugar, or other components. This can result in lumpy batters, inconsistent doughs, and ultimately, failed recipes. Conversely, if the beater is too low, it can scrape against the bowl, causing an unpleasant grinding noise and potentially damaging both the attachment and the bowl’s finish. Over time, excessive friction can also strain the mixer’s motor, leading to premature wear and costly repairs. Signs of improper clearance often include persistent unmixed ingredients, a wobbly mixer head during operation, or audible scraping sounds. Achieving the ideal clearance is the secret to flawlessly integrated mixtures and a well-preserved appliance.
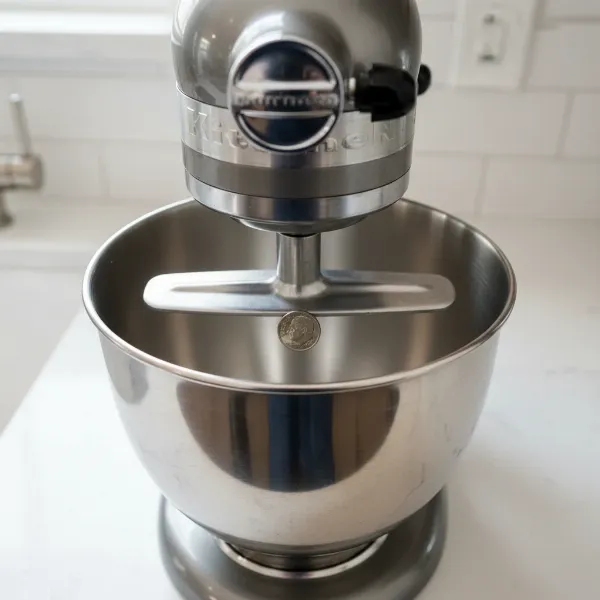 A stand mixer with a flat beater and a dime at the bottom, illustrating beater-to-bowl clearance.
Step-by-Step Guide: How to Perform the Dime Test on Your Stand Mixer
The dime test is a straightforward yet highly effective method to assess and correct your stand mixer’s beater-to-bowl clearance. It provides a tangible reference point to ensure your attachments are optimally positioned.
What You’ll Need
Before you begin, gather these simple items:
- Your stand mixer (with its mixing bowl).
- A flat beater (paddle attachment), which is the most common attachment used for this test.
- A dime (a US 10-cent coin), valued for its consistent 1/16th-inch thickness, making it an ideal gauge. If a dime isn’t available, any coin or flat object of similar thickness can work, though the dime is the standard.
- A screwdriver (either flathead or Phillips, depending on your mixer’s adjustment screw).
|
Our Picks for the Best Stand mixer in 2026
As an Amazon Associate I earn from qualifying purchases.
|
||
| Num | Product | Action |
|---|---|---|
| 1 | Cuisinart SM-50G Precision Master 5.5-Quart 12-Speed Stand Mixer with Mixing Bowl, Chef's Whisk, Flat Mixing Paddle, Dough Hook, and Splash Guard with Pour Spout, Agave Green, Manual |

|
| 2 | Cuisinart SMD-50CRM Precision Pro 5.5-Quart Digital Stand Mixer with 12-Speeds, 3 Preprogrammed Food Prep Settings, Mixing Bowl, Chef's Whisk, Flat Mixing Paddle, Dough Hook, and Splash Guard, Cream |
|
| 3 | Cuisinart Stand Mixer, 12 Speeds, 5.5-Quart Mixing Bowl, Chef's Whisk, Flat Mixing Paddle, Dough Hook, and Splash Guard with Pour Spout, Silver Lining, SM-50BC, Silver Lining |
|
| 4 | 3-IN-1 Electric Stand Mixer, 6.5QT Bowl 660W 10-Speed Kitchen Mixer, Household Food Mixers include Dough Hook, Beater and Whisk, Bread Cake Mixer for Baking and Most Home Cooks, Red |
|
| 5 | Cuisinart SPI-50 Spiralizer, White |
|
| 6 | Cuisinart SMD-50GPH Precision Pro 5.5-Quart Digital Stand Mixer with 12-Speeds, 3 Preprogrammed Food Prep Settings, Mixing Bowl, Whisk, Flat Mixing Paddle, Dough Hook, and Splash Guard, Graphite |
|
| 7 | Kitchen in the box Stand Mixer,3.2Qt Mini Electric Food Mixer,6 Speeds Portable Lightweight Kitchen Mixer for Daily Use with Egg Whisk,Dough Hook,Flat Beater (Green) |
|
| 8 | Kitchen in the box Stand Mixer,3.2Qt Small Electric Food Mixer,6 Speeds Portable Lightweight Kitchen Mixer for Daily Use with Egg Whisk,Dough Hook,Flat Beater (Blue) |
|
| 9 | Cuisinart SMD-50BC Precision Pro 5.5-Quart Digital Stand Mixer With 12-Speeds, 3 Preprogrammed Food Prep Settings, Mixing Bowl, Whisk, Flat Mixing Paddle, Dough Hook, And Splash Guard, Silver Lining |
|
| 10 | Kitchen in the box Stand Mixer,3.2Qt Small Electric Food Mixer,6 Speeds Portable Lightweight Kitchen Mixer for Daily Use with Egg Whisk,Dough Hook,Flat Beater (Black) |
|
The Dime Test Procedure
Follow these steps carefully to perform the dime test:
- Safety First: Unplug Your Mixer. Always ensure your stand mixer is unplugged from the power outlet before handling any internal components or attachments.
- Attach the Flat Beater. Securely attach the flat beater (paddle attachment) to the mixer’s planetary shaft.
- Place the Dime in the Bowl. Set your clean mixing bowl into its locked position on the mixer. Place a single dime flat on the bottom of the bowl, roughly in the center.
- Lower and Lock the Mixer Head/Bowl. For tilt-head models, lower the head and lock it into place. For bowl-lift models, raise the bowl and ensure it’s securely locked on its pins.
- Plug In and Set to Low Speed. Plug your mixer back into the outlet. Turn the speed control to the lowest setting, often labeled “stir” or Speed 1. Do not use high speeds during this test.
- Observe the Dime’s Movement. Watch how the flat beater interacts with the dime. This observation is key to determining your mixer’s current calibration.
Interpreting the Dime Test Results
The way the dime moves (or doesn’t move) provides clear insight into your mixer’s beater-to-bowl clearance. Understanding these indicators is crucial for proper adjustment.
Beater Too High (Dime Doesn’t Move)
If the beater is too high, it will pass over the dime without touching it, or only cause it to vibrate slightly without moving it around the bowl. This indicates that there’s too much space between the beater and the bowl’s bottom.
Symptoms:
- A visible layer of unmixed ingredients (flour, sugar, butter) at the bottom or along the sides of the bowl after mixing.
- Difficulty creaming butter and sugar effectively.
- Meringues or whipped cream failing to reach their full volume because the whisk can’t adequately incorporate air at the bottom of the bowl.
- A general lack of thoroughness in mixing smaller batches of ingredients.
Beater Too Low (Dime Moves Continuously/Scrapes)
When the beater is too low, it will aggressively push the dime around the bowl, continuously hitting it or even grinding against it. This signifies that the beater is too close to, or actively scraping, the bottom of the bowl.
Symptoms:
- Loud scraping or grinding noises during operation.
- Visible wear or damage to the beater’s coating (if applicable) or to the bottom of your stainless steel bowl.
- The beater might get stuck on the dime or struggle to move past it.
- Potential strain on the mixer’s motor due to increased friction.
- Difficulty attaching or removing the beater.
The Perfect Clearance (Dime Moves Gently)
The ideal scenario for your stand mixer’s calibration is when the beater gently nudges the dime, moving it about 1/4 to 1/2 inch with each pass. The dime should slowly travel around the bowl without being continuously trapped, aggressively pushed, or completely ignored.
Benefits of Perfect Clearance:
- Thorough and Even Mixing: Every ingredient, down to the last speck of flour, is incorporated, resulting in uniform batters and perfectly kneaded doughs.
- Optimal Aeration: For tasks like whipping egg whites or cream, the attachment can effectively incorporate air, leading to lighter, fluffier results.
- Prevented Damage: No scraping means no wear and tear on your attachments or bowl, extending their lifespan.
- Reduced Strain: The motor operates efficiently without undue stress, contributing to the overall longevity of your stand mixer.
- Consistent Recipe Outcomes: You can trust that your mixer is doing its part to deliver predictable, high-quality results every time.
Adjusting Your Stand Mixer for Optimal Performance
Once you’ve diagnosed the clearance issue with the dime test, the next step is to make the necessary adjustments. This process typically involves a small screw on your mixer.
- Safety First: Unplug Your Mixer. Always ensure the mixer is unplugged before attempting any adjustments.
- Locate the Adjustment Screw.
- For Tilt-Head Mixers: Tilt the head back. Look for a small screw located on the neck of the mixer, just behind where the head connects to the base. It’s often recessed and may be covered by a small cap.
- For Bowl-Lift Mixers: The adjustment screw is usually found near the bowl support pins, often on the main stand column.
- Make Small Adjustments. Use a screwdriver to turn the adjustment screw in very small increments. Think of a clock face: a quarter turn (from 12 o’clock to 3 o’clock or 9 o’clock) is usually sufficient for each adjustment.
- To lower the beater (if it was too high): Turn the screw clockwise.
- To raise the beater (if it was too low): Turn the screw counter-clockwise.
- Important Note: Some specific models, particularly certain KitchenAid bowl-lift mixers manufactured after 2003, may have reversed adjustment directions. If turning one way doesn’t produce the desired effect, try turning in the opposite direction. The screw generally won’t turn more than a half-turn in total, so avoid forcing it.
“Precision is paramount when calibrating your stand mixer. A slight turn can make a significant difference. Always adjust in small increments and re-test, rather than attempting a large adjustment all at once.” – Admin, Standmixerpro.com, Stand Mixer Technician
- Re-test and Fine-Tune. After each small adjustment, lower/raise the head/bowl, plug the mixer back in, and repeat the dime test. Observe the dime’s movement again. Continue this process of adjusting and re-testing until the dime gently moves 1/4 to 1/2 inch with each pass of the beater.
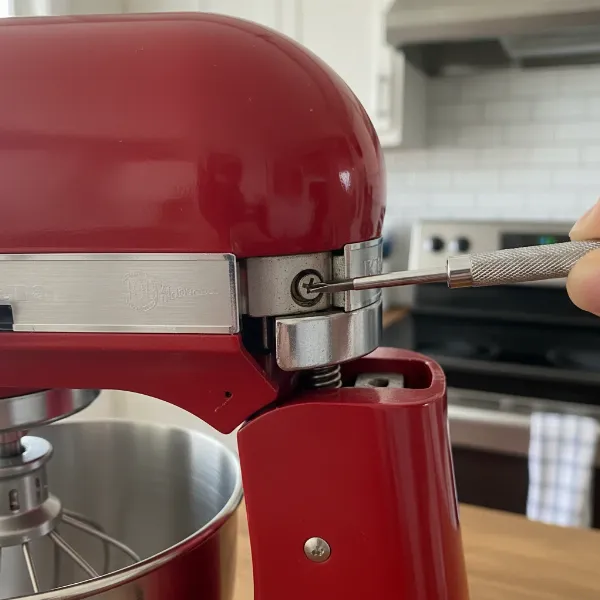 A close-up of a stand mixer's adjustment screw for beater-to-bowl clearance calibration.
Troubleshooting Common Stand Mixer Calibration Issues
While the dime test is broadly applicable, some situations might require additional attention.
- Older Models Without Adjustment Screws: Some very old stand mixers, particularly certain vintage KitchenAid models, may not have an external adjustment screw. For these, professional repair or alternative methods like carefully bending the beater shaft or placing thin washers on the bowl pins (to slightly raise the bowl) might be necessary. However, exercise extreme caution with these methods to avoid damage.
- Still Uneven Mixing After Adjustment: If, after successfully calibrating with the dime test, you still notice unmixed ingredients, check your attachments for any warping or damage. Also, ensure your mixing bowl is seated correctly and not slightly askew. Sometimes, very small batches might still benefit from a quick scrape down with a spatula.
- When to Seek Professional Help: If you’ve followed the steps, attempted adjustments in both directions, and your mixer still won’t calibrate properly, or if you hear unusual noises or experience mechanical issues, it’s best to consult a qualified technician. Attempting repairs beyond basic adjustments can void warranties or cause further damage.
Beyond Calibration: Maximizing Your Stand Mixer’s Lifespan
Proper calibration is a cornerstone of stand mixer maintenance, but extending your appliance’s life involves a holistic approach to care.
- Proper Cleaning After Each Use: Always unplug and thoroughly clean your mixer after each use. Wipe down the motor housing with a damp cloth and ensure the bowl and attachments are washed promptly. Many attachments are dishwasher-safe, but always check your manual. Prevent food debris from drying onto components, as this can affect future performance and hygiene.
- Storing Attachments: Store attachments properly to prevent warping or damage. Avoid tossing them haphazardly into drawers where they might bend or chip. Many mixers come with an accessory hub or designated storage solutions.
- Regular Check-Ups: Make the dime test a semi-annual or annual routine, especially if you use your mixer frequently. This proactive check can catch minor misalignments before they become significant problems. Periodically inspect the power cord for damage and ensure all moving parts operate smoothly.
- Knowing When to Upgrade/Repair: While many stand mixers are built to last, recognizing when to repair versus replace is crucial. Minor issues like brush replacement or simple adjustments are often cost-effective to repair. However, major motor issues or consistent problems despite troubleshooting might signal it’s time to consider a new appliance.
Conclusion
The dime test is a simple yet powerful tool in any baker’s arsenal, ensuring your stand mixer provides the consistent, thorough mixing it was designed for. By taking a few minutes to calibrate your appliance, you can eliminate frustrating pockets of unmixed ingredients, prevent potential damage, and elevate the quality of your baked goods. This easy adjustment transforms your mixer from merely a machine into a finely tuned instrument, ready to tackle any recipe with precision. We encourage you to try the dime test today and experience the difference a perfectly calibrated stand mixer makes. What culinary masterpiece will you create with your newly optimized mixer?
Frequently Asked Questions
Can I use the dime test on any stand mixer?
While the dime test is most commonly associated with KitchenAid stand mixers (both tilt-head and bowl-lift models), the principle of checking beater-to-bowl clearance applies to many stand mixers. However, the exact adjustment mechanism and ideal dime movement might vary, and some non-KitchenAid mixers may not have an adjustable height feature.
How often should I calibrate my stand mixer?
For regular users, performing the dime test every six to twelve months is a good practice. If you notice signs of inconsistent mixing, unusual noises, or have recently moved your mixer, it’s a good idea to perform the test sooner.
What if my mixer doesn’t have an adjustment screw?
Some older or less common Stand Mixer models may lack an easily accessible adjustment screw. In such cases, consult your mixer’s manual or a qualified appliance technician. For certain older KitchenAid models, very careful physical adjustments or the use of washers under the bowl pins might be required, but this should only be done with expert guidance.
What kind of coin should I use if I don’t have a dime?
The standard US dime is approximately 1/16th of an inch (1.27 mm) thick. If you don’t have a dime, find a coin or a thin, flat object of similar thickness. The key is to have a consistent, small gauge to observe the beater’s clearance.
Does adjustment affect all attachments?
Yes, adjusting the beater-to-bowl clearance primarily affects the height of all attachments (flat beater, wire whip, dough hook) relative to the bottom of the bowl. Once the adjustment is made using the flat beater, the other attachments should also be at their optimal height.