Do you love your KitchenAid stand mixer but wish it came in a color that perfectly matched your unique kitchen aesthetic? Perhaps your trusty appliance has seen better days, with scuffs and chips telling tales of countless baking adventures. Instead of investing in a brand-new mixer, imagine giving your current one a stunning, personalized makeover with a fresh coat of paint. This comprehensive guide will walk you through every step of custom painting your KitchenAid mixer, ensuring a professional, durable finish that reflects your style without breaking the bank.
Stand Mixer Personalization: A Brief Overview
Your KitchenAid stand mixer is more than just a kitchen appliance; it’s often a centerpiece on your countertop. While KitchenAid offers an impressive array of factory colors, the desire for truly unique or perfectly coordinated hues often leads home bakers to explore customization. Painting your stand mixer is a cost-effective and creative way to infuse your personality into your kitchen decor, giving a beloved appliance a second life or a stylish upgrade.
The journey of stand mixers, from utilitarian workhorses to iconic design statements, highlights their central role in the modern kitchen. Customizing yours isn’t just a trend; it’s a testament to personal expression and resourceful home improvement. Whether you’re aiming for a sleek, modern update, a retro revival, or a vibrant pop of color, a DIY paint job opens up a world of possibilities for a truly one-of-a-kind appliance.
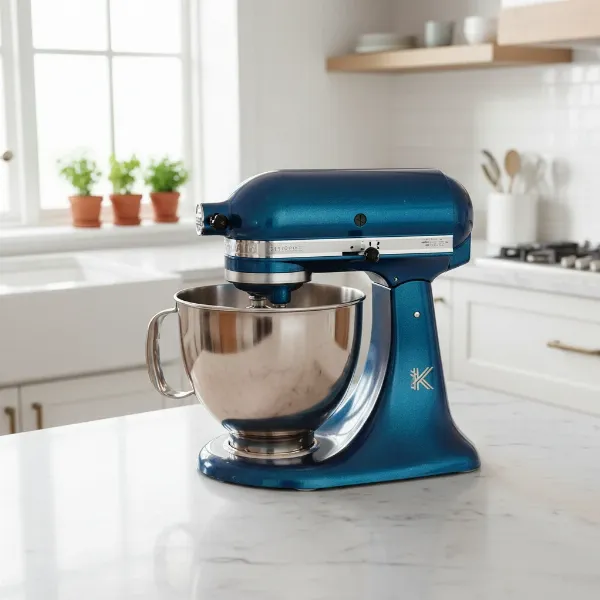 A brightly colored, custom-painted KitchenAid stand mixer with unique design
Choosing the Right Approach: Paint Types and Tools
The success of your KitchenAid mixer paint project hinges on selecting the right materials and having the necessary tools at hand. Quality products ensure a long-lasting, professional-looking finish.
Selecting Your Paint
For a durable finish on a metal appliance like a KitchenAid mixer, specific types of paint are recommended:
- Spray Paint: This is the most common and recommended method for a smooth, even finish. Look for enamel spray paints or appliance epoxy paints that are specifically designed to adhere to metal and plastic. Brands like Rust-Oleum and Colorshot are popular choices. Some spray paints even combine primer and paint, simplifying the process.
- Primer: A crucial first step, primer ensures excellent adhesion of the color coat and a smoother final appearance. Opt for a metal-bonding primer or a self-etching primer. If using a paint that doesn’t include primer, this step is non-negotiable.
- Clear Protective Topcoat: To protect your new paint job from chips, scratches, and everyday wear, a clear topcoat is essential. Choose a gloss enamel or acrylic enamel clear spray to seal and add a desired sheen to your custom color.
|
Our Picks for the Best Stand mixer in 2026
As an Amazon Associate I earn from qualifying purchases.
|
||
| Num | Product | Action |
|---|---|---|
| 1 | Cuisinart SMD-50BC Precision Pro 5.5-Quart Digital Stand Mixer With 12-Speeds, 3 Preprogrammed Food Prep Settings, Mixing Bowl, Whisk, Flat Mixing Paddle, Dough Hook, And Splash Guard, Silver Lining |

|
| 2 | Cuisinart SMD-50CRM Precision Pro 5.5-Quart Digital Stand Mixer with 12-Speeds, 3 Preprogrammed Food Prep Settings, Mixing Bowl, Chef's Whisk, Flat Mixing Paddle, Dough Hook, and Splash Guard, Cream |
|
| 3 | Kitchen in the box Stand Mixer,3.2Qt Small Electric Food Mixer,6 Speeds Portable Lightweight Kitchen Mixer for Daily Use with Egg Whisk,Dough Hook,Flat Beater (Black) |
|
| 4 | Cuisinart SPI-50 Spiralizer, White |
|
| 5 | Kitchen in the box Stand Mixer,3.2Qt Small Electric Food Mixer,6 Speeds Portable Lightweight Kitchen Mixer for Daily Use with Egg Whisk,Dough Hook,Flat Beater (Blue) |
|
| 6 | Cuisinart SMD-50GPH Precision Pro 5.5-Quart Digital Stand Mixer with 12-Speeds, 3 Preprogrammed Food Prep Settings, Mixing Bowl, Whisk, Flat Mixing Paddle, Dough Hook, and Splash Guard, Graphite |
|
| 7 | Kitchen in the box Stand Mixer,3.2Qt Mini Electric Food Mixer,6 Speeds Portable Lightweight Kitchen Mixer for Daily Use with Egg Whisk,Dough Hook,Flat Beater (Green) |
|
| 8 | Cuisinart SM-50G Precision Master 5.5-Quart 12-Speed Stand Mixer with Mixing Bowl, Chef's Whisk, Flat Mixing Paddle, Dough Hook, and Splash Guard with Pour Spout, Agave Green, Manual |
|
| 9 | 3-IN-1 Electric Stand Mixer, 6.5QT Bowl 660W 10-Speed Kitchen Mixer, Household Food Mixers include Dough Hook, Beater and Whisk, Bread Cake Mixer for Baking and Most Home Cooks, Red |
|
| 10 | Cuisinart Stand Mixer, 12 Speeds, 5.5-Quart Mixing Bowl, Chef's Whisk, Flat Mixing Paddle, Dough Hook, and Splash Guard with Pour Spout, Silver Lining, SM-50BC, Silver Lining |
|
Essential Tools and Materials
Gathering all your supplies before you begin will streamline the process:
- Fine-Grit Sandpaper: 120- to 400-grit sandpaper or a sanding block to scuff the original finish.
- Degreasing Cleaner: Rubbing alcohol, denatured alcohol, dish soap, or an all-purpose kitchen degreaser to thoroughly clean the mixer.
- Microfiber Cloths or Baby Wipes: For cleaning and wiping away dust.
- Painter’s Tape: High-quality tape (e.g., Frog Tape) for precision masking.
- X-Acto Knife or Utility Knife: For precise cutting of painter’s tape around intricate details.
- Screwdrivers: Assorted sizes for disassembling removable parts.
- Drop Cloths or Painter’s Plastic: To protect your work surface and surrounding areas from overspray.
- Blocks of Wood or a Turntable: To elevate the mixer, allowing you to paint the bottom edges and rotate it easily.
- Respirator Mask: To protect yourself from paint fumes and dust.
- Safety Goggles: To protect your eyes.
- Disposable Gloves: To keep your hands clean.
Step-by-Step Guide: How to Paint Your KitchenAid Mixer
Achieving a beautiful, durable custom finish on your KitchenAid mixer requires patience and attention to detail. Follow these phases carefully for the best results.
Phase 1: Meticulous Preparation
Preparation is arguably the most critical step, accounting for the majority of your project time. It determines how well the paint adheres and how long it lasts.
- Document Your Mixer: Before touching anything, take several “before” photos of your mixer from various angles. These serve as a valuable reference during reassembly, especially if you disassemble more complex models.
- Disassembly vs. Strategic Masking:
- Minimal Disassembly: For most DIYers, removing easily detachable parts is sufficient. This includes the back plate (usually held by one screw), the attachment hub knob, and any metal band or logo strips around the head (often held by small screws underneath the back plate). Store these small parts in a labeled baggie to prevent loss.
- Extensive Disassembly: Some advanced DIYers opt to fully dismantle the mixer, separating the motor housing from the base. This allows for painting all hidden crevices but carries the risk of not being able to reassemble it correctly, potentially affecting the mixer’s mechanics. If you’re not comfortable with this, meticulous taping is a safer alternative.
- Deep Cleaning for Optimal Adhesion: Thoroughly clean the entire surface of your mixer to remove all grease, grime, food residue, and sticky spots. Use a degreasing cleaner and scrub well. Follow up with a wipe-down using rubbing alcohol or denatured alcohol to eliminate any lingering oils or cleaning solution residue. Allow it to dry completely.
- Sanding for a Perfect Surface: Gently sand all surfaces you intend to paint using fine-grit sandpaper (e.g., 220 or 400 grit). The goal is not to remove all the original paint but to “scuff” the existing glossy finish, creating a slightly rough texture that the primer and new paint can bond to effectively. After sanding, use a microfiber cloth to wipe away all dust and debris. A clean surface is paramount for adhesion.
- Precision Taping for Clean Lines: Carefully mask off all parts you don’t want painted. This includes the chrome accents, screws, speed lever, power cord, the interior of the attachment hub, and any rubber feet on the bottom. Use an X-Acto knife for intricate areas to achieve sharp, clean edges. This step is time-consuming but essential for a professional finish.
- Setting Up a Well-Ventilated Workspace: Choose a well-ventilated area for painting, such as outdoors on a calm day or in an open garage. Lay down drop cloths or painter’s plastic to protect your floors and surroundings from overspray. Elevate your mixer on blocks of wood or a turntable to make it easier to reach all angles, especially the bottom edges. Always wear a respirator mask and safety goggles.
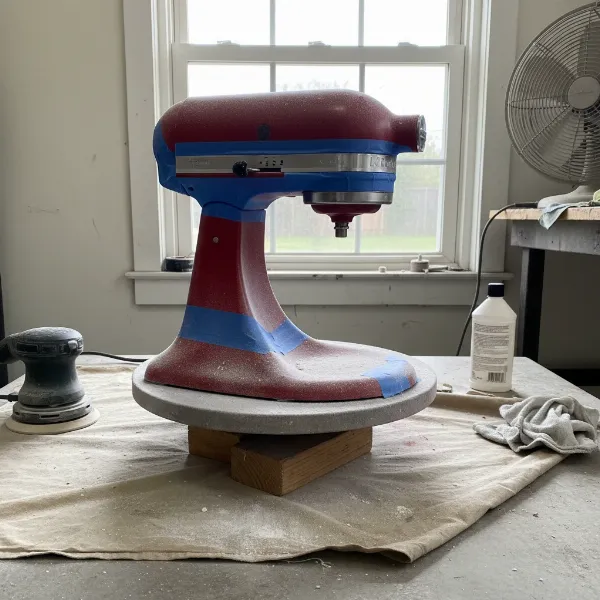 KitchenAid mixer meticulously taped and elevated, ready for custom paint application
Phase 2: The Art of Painting
With preparation complete, it’s time to bring your vision to life with color. Remember that patience is key for smooth, drip-free coats.
- Priming for a Lasting Foundation:
- Shake your primer can vigorously for at least one minute.
- Apply 1-2 thin, even coats of primer. Hold the can approximately 8-12 inches from the mixer and use steady, sweeping motions. Avoid holding the can in one spot to prevent drips.
- Allow each coat of primer to dry completely according to the manufacturer’s instructions (typically 15-30 minutes). Insufficient drying time can lead to bubbling or poor adhesion.
- Applying Color with Light, Even Coats:
- Once the primer is fully dry, shake your chosen color spray paint well.
- Apply multiple light coats of color. This is critical for preventing drips and achieving a smooth, factory-like finish. It’s far better to apply several thin coats than one or two thick ones.
- Maintain a consistent distance (around 8-12 inches) and use continuous sweeping motions.
- Allow each coat to dry to the touch before applying the next, usually 1-2 hours, but always follow the can’s specific instructions. This ensures proper adhesion and prevents smudging. You may need 3-5 coats for full, opaque coverage.
- Adding a Protective Clear Coat:
- Once your final color coat is completely dry (after several hours or overnight), apply 2-3 thin, even coats of the clear protective topcoat. This layer provides durability, adds shine, and protects your custom paint job from chips and scratches.
- Follow the same application technique as with the primer and color coats: light, even passes, allowing adequate drying time between each.
Phase 3: Curing and Reassembly
The final phase involves allowing the paint to fully cure and carefully reassembling your now custom-designed KitchenAid mixer.
- Allowing Adequate Curing Time: This is one of the most overlooked yet vital steps. While the paint may feel dry to the touch in a few hours, it needs time to fully harden or “cure.” Allow your mixer to sit untouched in a non-humid, comfortable temperature room for at least 24-72 hours, or even longer if recommended by the paint manufacturer. Rushing this step can lead to easily damaged paint.
- Careful Reassembly: Once fully cured, carefully remove all painter’s tape. Peel slowly to avoid pulling up any paint. Reattach all disassembled parts, referring to your “before” photos as needed. Ensure all screws are securely fastened and electrical components are correctly in place.
Common Pitfalls and Expert Tips for a Flawless Finish
Even experienced DIYers can encounter challenges. Being aware of common mistakes and incorporating expert tips can save you time and frustration.
Common Pitfalls to Avoid:
- Rushing the Process: Impatience during cleaning, sanding, or drying between coats is the leading cause of poor results, including peeling paint, drips, and an uneven finish. Each step requires its due time.
- Applying Too-Thick Coats: This almost guarantees drips, runs, and an unsightly, unprofessional texture. Always aim for multiple thin, even layers.
- Inadequate Cleaning or Sanding: If the surface isn’t perfectly clean and properly scuffed, the paint won’t adhere well and will chip or peel prematurely. Grease and grime are paint’s worst enemies.
Expert Tips for Success:
- Dealing with Drips and Imperfections: If you notice a drip, resist the urge to wipe it immediately while wet. Let it dry completely, then gently sand down the imperfection with fine-grit sandpaper. Clean the dust, and apply another light coat of paint over the area.
- Safety and Ventilation: Always prioritize your health. Work in a well-ventilated area and wear appropriate personal protective equipment, including a respirator mask and safety goggles, to protect against fumes and airborne particles.
- Considering Advanced Paint Options: For maximum durability, particularly if your mixer sees heavy use, research 2K epoxy paints. These are two-part paints (base + hardener) that offer superior hardness and chemical resistance, often found in automotive or industrial applications. They are more complex to use but provide a tougher finish.
- Temperature and Humidity: Pay attention to the recommended temperature and humidity ranges on your paint cans. Painting in extreme conditions can affect drying times and paint adhesion.
“The secret to a successful paint project isn’t just about the paint itself, but the diligent preparation and patient application. Never underestimate the power of a clean, properly prepped surface and thin, even coats.” – Admin, Standmixerpro.com
Buying Guide: Where to Find Your Painting Supplies
Finding the right materials is crucial for your KitchenAid mixer painting project. Here’s where to look:
- Local Hardware Stores (e.g., Home Depot, Lowe’s): These are excellent sources for spray paints (like Rust-Oleum), primers, clear coats, sandpaper, painter’s tape, and drop cloths. You can often get advice from store associates on specific products for metal surfaces.
- Automotive Supply Stores: For more robust options like 2K epoxy paints or specialized primers, an automotive paint store can be a valuable resource. These paints are formulated for extreme durability.
- Online Retailers (e.g., Amazon, specialty craft stores): Websites offer a wider selection of colors and brands, including popular options like Colorshot. Just ensure you check reviews and shipping times.
When purchasing, prioritize products specifically designed for metal or appliance use to ensure longevity and adherence.
Buying Guide: Stand Mixer Painting Edition
Embarking on a KitchenAid mixer painting project is a rewarding endeavor that offers both creative satisfaction and practical benefits. It’s an opportunity to personalize your kitchen and extend the life of a valuable appliance.
The key to a successful outcome lies in two core principles: patience and quality materials. Rushing any stage, especially preparation or drying, is the most common pitfall. Invest in good quality sandpaper, cleaning agents, and—most importantly—primer, paint, and a clear coat designed for durable metal adhesion.
The benefits of DIY customization are clear: significant cost savings compared to buying a new mixer, the joy of a unique appliance that perfectly matches your style, and the satisfaction of a hands-on project. Don’t be intimidated; with this guide, a bit of courage, and a steady hand, you can transform your KitchenAid mixer from ordinary to extraordinary.
Ready to give your mixer a vibrant new life? What color will you choose for your custom KitchenAid creation?
Frequently Asked Questions
Is it safe to paint a KitchenAid mixer?
Yes, it is generally safe to paint a KitchenAid mixer, provided you use appropriate paints (e.g., appliance epoxy or enamel spray paints) and allow them to fully cure. Ensure the painted areas do not come into direct contact with food, and always work in a well-ventilated area to avoid inhaling fumes.
What kind of paint works best on a KitchenAid mixer?
Appliance epoxy or enamel spray paints that are specifically formulated for metal surfaces are ideal for KitchenAid mixers. Brands like Rust-Oleum and Colorshot are frequently recommended for their durability and strong adhesion. A clear protective topcoat is also essential for a long-lasting finish.
How long does the paint job last on a KitchenAid mixer?
With proper preparation, quality materials, and sufficient curing time, a custom paint job on a KitchenAid mixer can last for many years without chipping or peeling. Durability is heavily dependent on meticulous surface preparation, thin application of coats, and allowing the paint to fully harden before regular use.
Can I paint my KitchenAid mixer without disassembling it?
While some guides recommend extensive disassembly, you can successfully paint your KitchenAid mixer with minimal disassembly by carefully removing only the easily detachable parts (like the back plate) and meticulously masking off all other areas you don’t want painted with painter’s tape and an X-Acto knife.
What grit sandpaper should I use for painting a KitchenAid mixer?
For optimal paint adhesion, use a fine-grit sandpaper, typically ranging from 120-grit to 400-grit. The goal is to lightly scuff the original glossy finish, creating a “tooth” for the primer and paint to grip, rather than sanding down to bare metal. Always wipe away all sanding dust before priming.